Introduction
Nuclear graphite is a critical structural material in high temperature gas reactors (HTGR) and molten salt reactors (MSR) owing to its excellent neutron moderation, high temperature resistance, and high radiation resistance [1, 2]. Generally, graphite components must be machined into complex shapes featuring notches, keyways, steps, and grooves to meet the requirements of connection, installation, and other necessities. Furthermore, acting as structural elements that provide channels for the coolant, control rods, fuel, and shutdown devices [3, 4], these components must be capable of enduring various loads including self-weight, mechanical forces, thermal and radiation induced stresses, and seismic events [5]. These loads may cause sufficient damage to initiate fracture [6-9] in the graphite components, particularly at keyway roots with sharp cross-sectional changes. Therefore, the damage and fracture properties of graphite must be considered in the design process to predict failure and ensure safe reactor operation.
As a heterogeneous and quasi-brittle material, unirradiated nuclear graphite, whether coarse-grained or fine-grained, exhibits nonlinear mechanical behavior, increasing fracture resistance with crack propagation (R-curve) and its nonlinear stress-strain relationship [10, 11]. Numerous studies have aimed to develop accurate damage constitutive models to simulate this nonlinear stress-strain behavior [12-15]. Graphite’s damage evolution is often characterized by quantifying the reduction in Young’s modulus [15-18], and studies have found that graphite exhibits significant damage evolution behavior under both tensile and compressive strains [2, 13]. Specifically, under tensile conditions, graphite displays more nonlinearity [18, 19]. Additionally, a model incorporating the identified damage law showed a better fit with experimental data than the linear elastic model [20]. Commonly, the forms of the damage law equations vary owing to the different assumptions considered. In certain studies [22, 22], it was hypothesized that the influence of microcrack development on the Young’s modulus of graphite under tensile strains is equivalent to an increase in porosity. From this, a porosity-related damage constitutive equation was derived [21]. In summary, the continuous damage mechanics model can provide accurate predictions of the stress-strain distribution in graphite components before the formation of the main crack [23]. However, after microcracks coalesce into a critical crack nucleus, material degradation is closely related to the degree of main crack propagation. In traditional macroscopic damage mechanics, the damage variable lacks a clear physical meaning, making correlation with crack propagation difficult. Therefore, it is important to consider the fracture criterion based on nonlinear fracture mechanics when simulating graphite.
The fracture criteria for nuclear graphite can be broadly classified into three categories: stress-based criteria [24-26], strain-based criteria [27, 28], and energy-based criteria [29, 30]. Many studies have attempted to clarify the applicability of each criterion. Sato et al. [31] observed that the maximum stress criteria is suitable for graphite with mode I cracks where tensile stress predominates. Mirsayar et al. [28] employed strain-based fracture criteria to investigate brittle fracture in graphite under mixed-mode loading. Tucker et al. [32] analyzed several failure criteria for polycrystalline graphite, including critical stress, critical strain, and critical strain energy density, and found that none of them could accurately describe the graphite fracture behavior. These criteria do not explicitly consider the effects of shear deformation, microcracks, and other irreversible energy dissipation processes on crack propagation resistance [33]. To partially overcome this limitation, a failure model for nuclear graphite was developed by combining the failure criteria of fracture mechanics with the theory of continuum damage mechanics [12]. In this model, the damage initiation was governed by stress criteria and the crack formation was determined by fracture energy. However, this model requires interface elements to be inserted along potential fracture paths, which are often difficult to know in advance. The cohesive crack model (CCM), which is similar to the above continuum damage model, is also commonly used to simulate fracture [34-36]. This model demands a cohesive constitutive relationship between cohesive force and relative displacement at the interface. Specifically, for a mode I crack, this relationship is known as the tensile softening curve (TSC). To obtain the TSC of nuclear graphite, the incremental displacement collocation method (IDCM) [36], which enables the point-by-point construction of the TSC by comparing the overall and local responses of the test specimens, was employed. For the convenient use of TSC applications in finite element software, the TSC is often fitted to bilinear [37], trilinear [38], or exponential [39] shapes. Specifically, Tang et al. [35] fitted the TSC as a trilinear polyline and assigned clear physical meanings to each segment, corresponding to different toughening mechanisms in the fracture process zone. Additionally, cohesive zone models (CZMs) and damage models based on traction-separation laws were employed to simulate graphite fracture in the ABAQUS software [40]. These models can simulate the fracture behavior of graphite after reaching its critical stress, typically determined by tensile strength, but they neglect early nonlinear stress-strain characteristics [41]. This may introduce errors to the stress-strain distribution within the models and cause inaccurate predictions of the failure loads for graphite components [20].
Considering graphite exhibits different mechanical properties under tension and compression [2, 42], its two mechanical responses to these scenarios must be captured during testing. Traditionally, this requires uniaxial tension and compression tests. However, numerous factors may introduce errors into uniaxial tests; in particular, during uniaxial tension tests [43], misalignment of the specimen can induce eccentric loading, which in turn may cause early failure of the specimen. An alternative for identifying material properties is the finite element model updating (FEMU) method [44], where the material parameters in a finite element model (FEM) of the experimental test are updated iteratively to minimize the difference between the measured and FEM-calculated data until optimal values are determined. This method has been successfully applied to characterize the nonlinear behavior of various graphite specimens under different stress states, including four-point bending beams [13], ring specimens [15], L-shaped specimens [20], and DCDC specimens [45, 46].
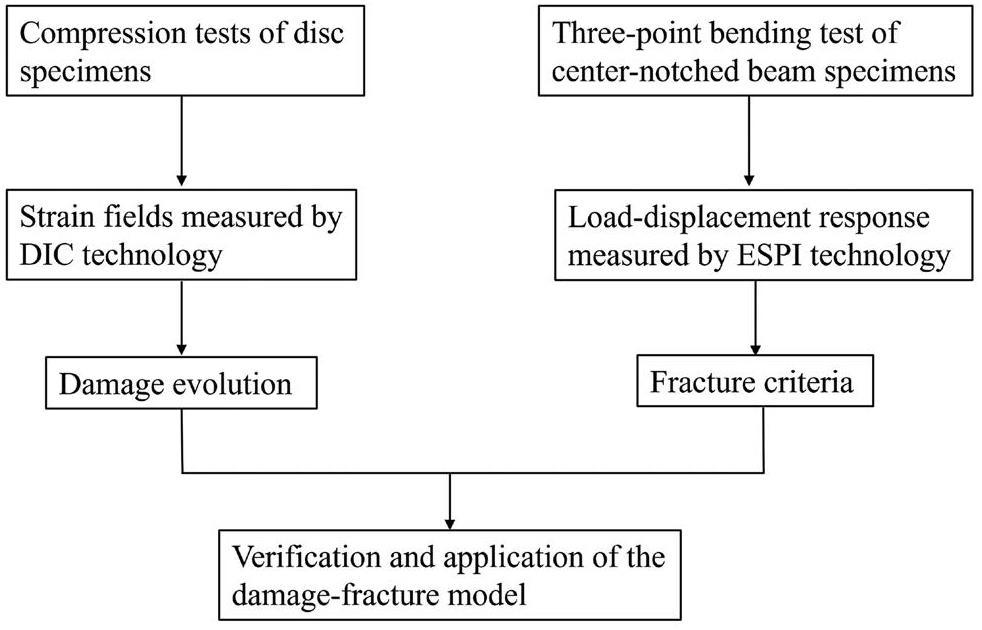
The objectives of this paper are to identify the damage evolution and fracture criteria in fine-grained graphite and incorporate them into finite element analyses, enabling simulations to not only model the nonlinear stress-strain response prior to microcrack coalescence but also show the crack propagation behavior after crack initiation. Firstly, to characterize damage evolution, compression tests were conducted on disc specimens of varying sizes made of a fine-grained graphite (CDI-1D graphite, produced by Chengdu Fangda Carbon Material Co., Ltd). During the tests, the full-field strains of the specimens were measured using digital image correlation (DIC) technology. Subsequently, the degradation law of the Young’s modulus was gradually determined from the measured full-field strains using a segmented inverse FEM. In addition, to determine the fracture criteria, the three-point bending test was conducted on the center-notched beam specimen made of a fine-grained graphite (IG11 graphite). Using electronic speckle pattern interferometry (ESPI) technology, accurate surface displacement fields of the specimens were observed, and the fracture energy and TSC were determined by comparing the load-displacement response between the test and the FEM. Finally, to assess the application potential of the damage-fracture model for simulating graphite components, tensile tests on L-shaped graphite specimens were simulated using finite element analyses incorporated with the identified constitutive model. The technical route is summarized in Fig. 1.
Materials and experiments
To investigate the damage and fracture characteristics in fine-grained graphite, two experiments employing both plain and notched specimen types were adopted. The first was compression testing on disc specimens, whereas the second was three-point bending tests on center-notched beam specimens. For the disc specimens, relatively uniform tensile and compressive stresses could be generated under load, leading to a sufficiently broad damage zone (inelastic region) for studying the damage evolution of graphite. For the center-notched beam specimen, the specimen could produce a stable mode-I crack propagation under load, and the inelastic region was relatively small owing to the stress concentration at the notch tip. The notched specimen’s total energy dissipation was almost used for the extension of the main crack, thus enabling the study of the graphite fracture criterion based on the energy method. Ultimately, the analytical results of both tests were used to develop a damage-fracture model for fine-grained graphite.
Compression tests of disc specimens
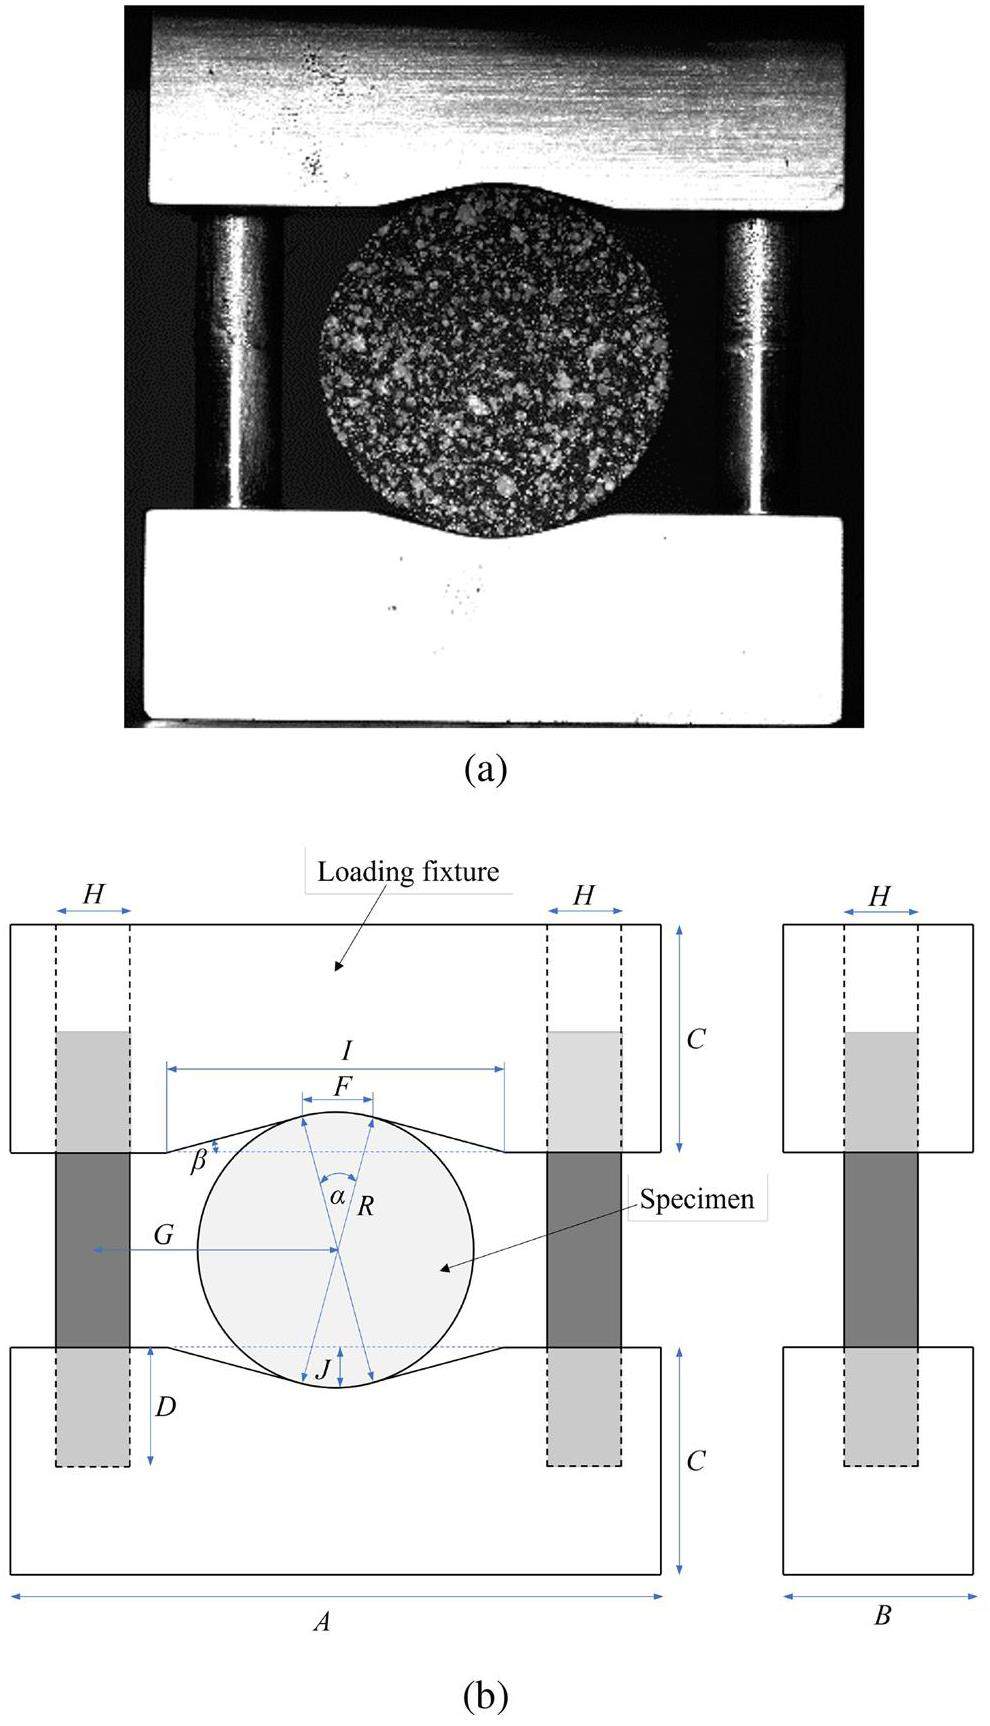
Compression tests were performed on three sizes of disc specimens, with ten specimens per size. The specimens were made of fine-grained graphite (CDI-1D graphite); their material properties are detailed in Table 1. The disc specimen and its fixture are shown in Fig. 2(a). Conforming to the recommendations of ASTM standards [47], the contact arc between the specimens and the fixtures was set to 30 (Fig. 2(b)), preventing premature failure because of excessive contact stress. The specific dimensional data are listed in Table 2.
| Properties | Value |
|---|---|
| Density (g/cm3) | 1.75 |
| Flexural strength (MPa) | 40 |
| Compressive strength (MPa) | 82 |
| Young’s modulus (GPa) | 10.5 |
| Forming method | Isostatically molded |
| Manufacturer | Chengdu Fangda Carbon Material |
| Type | Size (mm) | |||
|---|---|---|---|---|
| Specimen | Diameter | 10 | 15 | 20 |
| Thickness | 5 | 7.5 | 10 | |
| Fixture | R | 5 | 7.5 | 10 |
| D | 5 | 5 | 5 | |
| J | 1.5 | 1.5 | 1.5 | |
| C | 12 | 12 | 12 | |
| A | 30 | 30 | 30 | |
| B | 10 | 10 | 10 | |
| G | 10 | 10 | 10 | |
| F | 2.59 | 3.88 | 5.18 | |
| I | 12.51 | 13.17 | 13.83 | |
| H | 5 | 5 | 5 | |
| α | 30 | 30 | 30 | |
| β | 15 | 15 | 15 | |
During the test, the DIC technique was employed to measure the full-field deformation of the disc specimens. The MTS rig applied a loading rate of 0.05 mm/min to the fixtures, ensuring a quasi-static loading state and providing the necessary stable conditions for the DIC camera to record the data.
Three-point bending test of center-notched beam
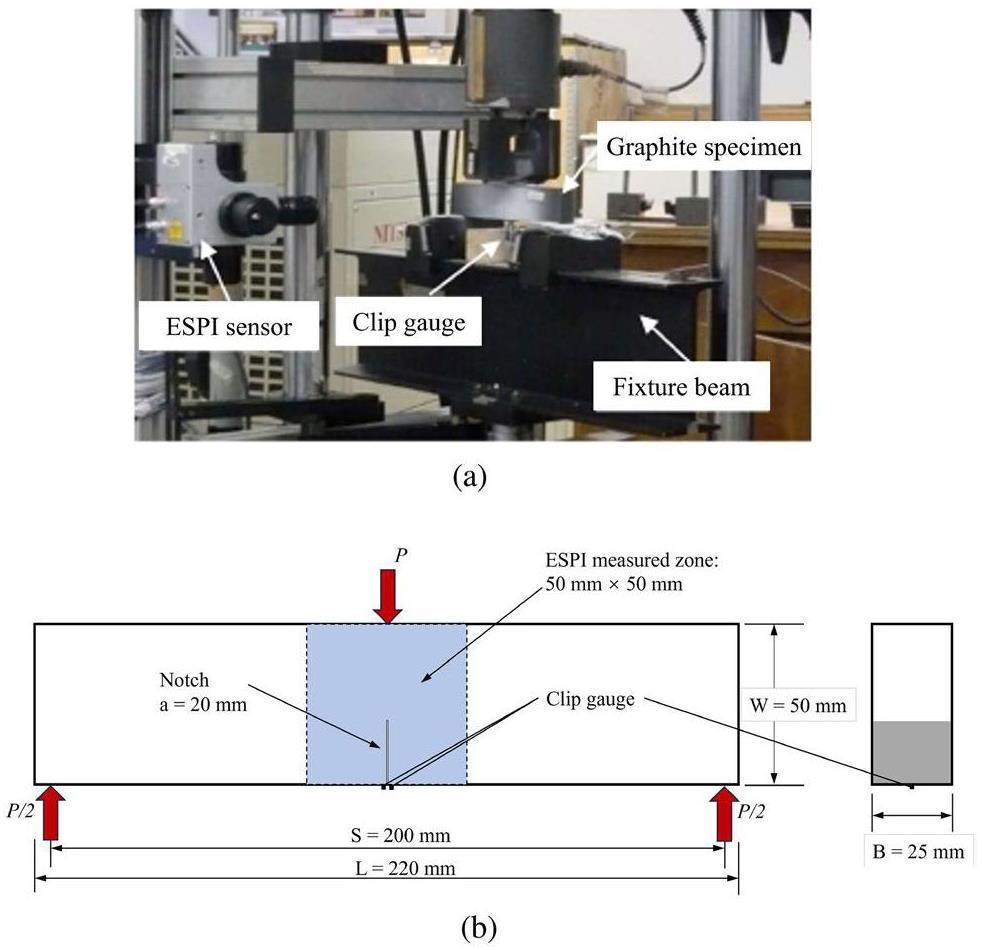
The three-point bending test was performed on a center-notched beam made of fine-grained graphite (IG11 graphite). The material properties of IG11 graphite are listed in Table 3. During the test, the ESPI technology was employed to measure the full-field displacements on the specimen surface accurately; a clip gauge was installed at the notch mouth to measure the crack mouth opening displacement (CMOD). A displacement-controlled MTS bend fixture was used in the test with a loading rate of 0.01 mm/min. This loading rate can provide a quasi-static loading state and the required stable conditions for the ESPI sensor to record the data. The experimental setup and the specimen dimensions are shown in Fig. 3(a) and 3(b), respectively.
| Properties | Value |
|---|---|
| Density (g/cm3) | 1.77 |
| Flexural strength (MPa) | 39 |
| Compressive strength (MPa) | 78 |
| Young’s modulus (GPa) | 10.0 |
| Grain size (mm) | 0.02 |
| Forming method | Isostatically molded |
| Manufacturer | Toyo Tanso |
Analysis methods
Damage evolution characterization
The damage evolution of graphite for both tension and compression was quantitatively characterized by monitoring the reduction in Young’s modulus with increasing strain in the disc specimens. To achieve this, at any material point, the six strain components in the global coordinate system were transformed into three principal strains. Then, it was assumed that the damage law of Young’s modulus (Eq. 1) was selected in accordance with the positive and negative of the principal strains.
The principal stresses σi were calculated from the principal strains using the constitutive relationship equation (Eq. 2).
To identify the damage law (Eq. 1) of Young’s modulus from the disc specimens, a finite element inversion method was developed based on the methodology of FEMU [44]. The inverse method establishes an FEM of the test specimen and iteratively updates the constitutive parameters to minimize the difference between the measured strain fields and the FEM-calculated values. The specific procedures were as follows:
Step 1: Implementing a segmented inversion analysis for the damage law in ABAQUS
To apply the aforementioned damage law in ABAQUS, it is necessary to predefine the functional relationship between the damage variable and strain, specifically the forms of
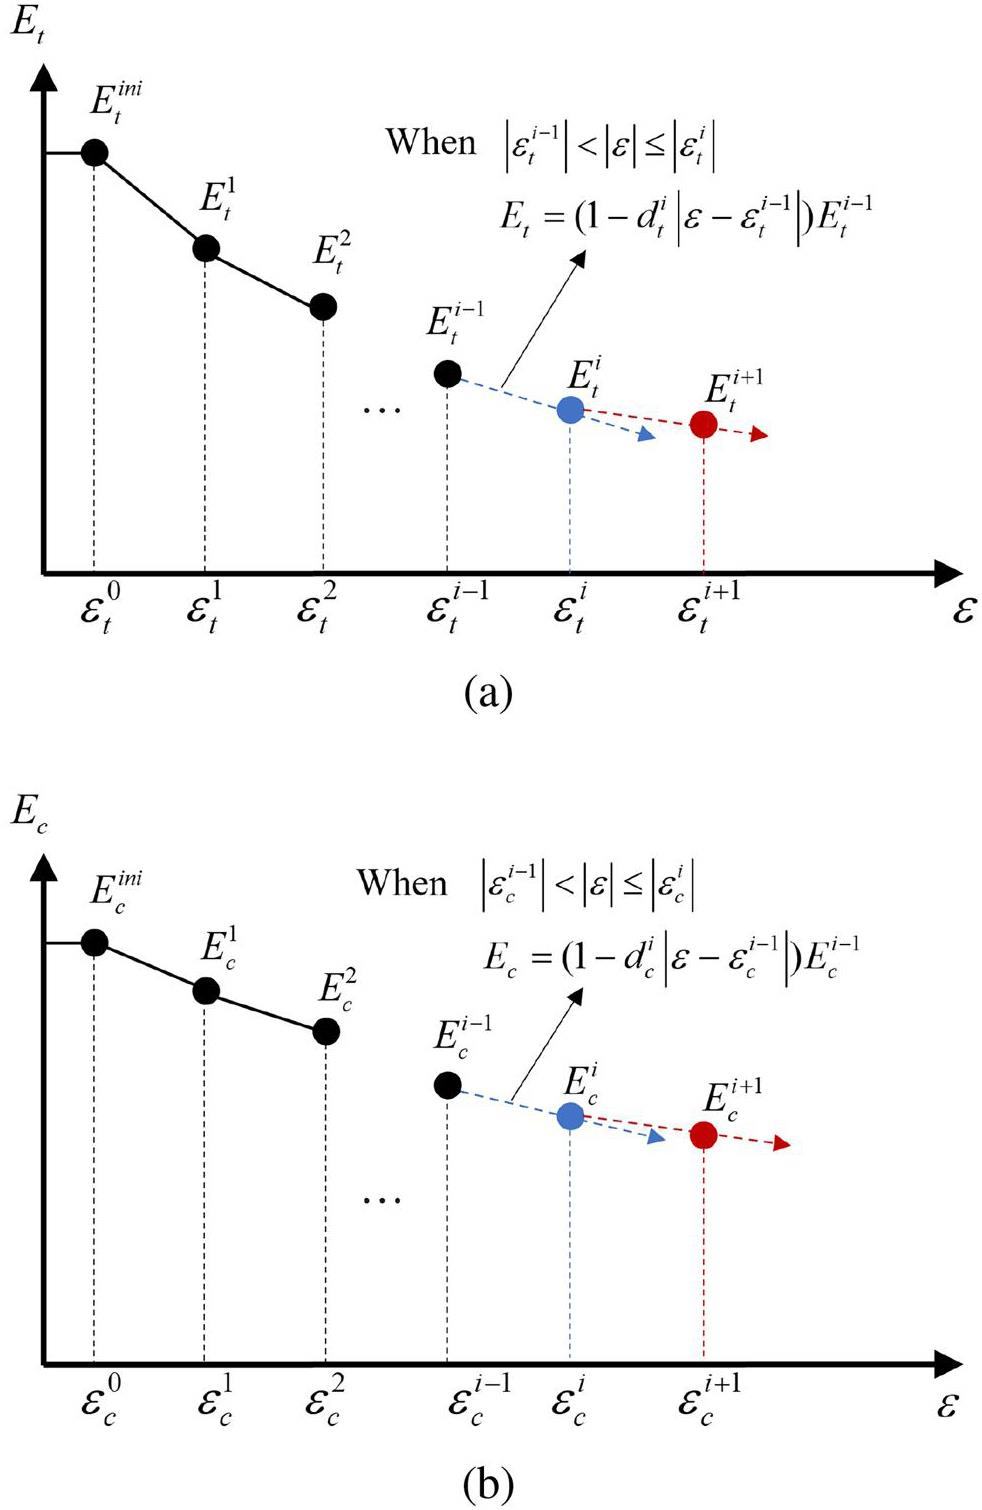
By utilizing the user-defined material subroutine (VUMAT) in ABAQUS, multiple piecewise functions were employed to characterize the damage behavior for Young’s modulus under tensile and compressive conditions, with the schematic representations for each condition illustrated in Figs. 4(a) and 4(b), respectively. Firstly, in the initial segment, the Young’s modulus for tension and compression were considered to represent linear elasticity (
Step 2: Determining the initial Young’s modulus
An FEM was established with the same boundary conditions as the disc compression tests in Sect. 2.1. The specimens were modeled as two-dimensional plane stress models, assuming a Poisson’s ratio of 0.2. Rigid bodies were used to represent the fixture surfaces in contact with the specimens. These contacts were defined as "hard" in the normal direction, with a friction coefficient of 0.17 for tangential interactions [48]. The quadrilateral element was employed; the model’s mesh is shown in Fig. 5.
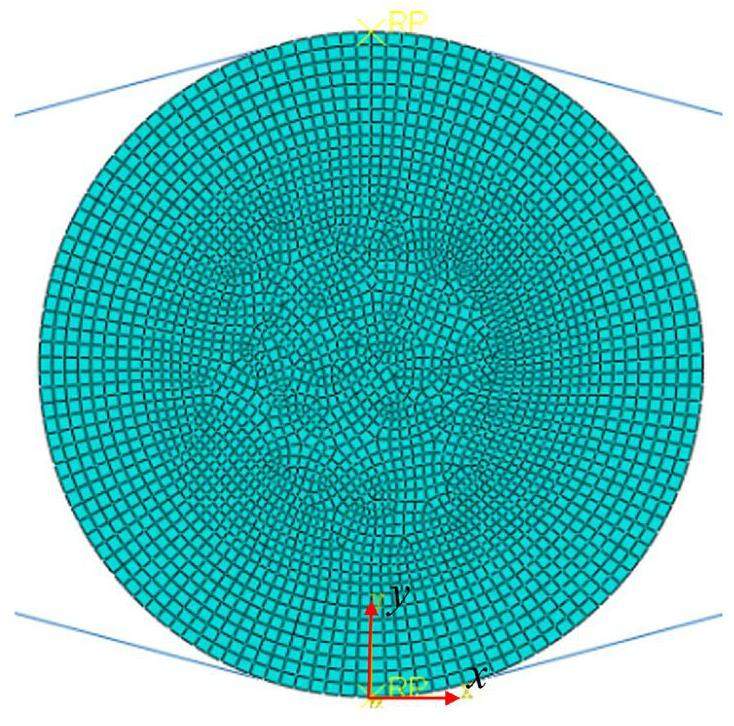
To achieve a good correlation between the model and the test, when the DIC-measured strain contours began to exhibit continuity (at approximately 17% of the peak load), the DIC strains were chosen as the target values. These values were then used to construct the objective function, Eq. 5. Note that the load applied in the FEM should always be consistent with the experimental load corresponding to the DIC strains used in the objective function (Eq. 5).
The Nelder-Mead simplex algorithm was employed to optimize parameters
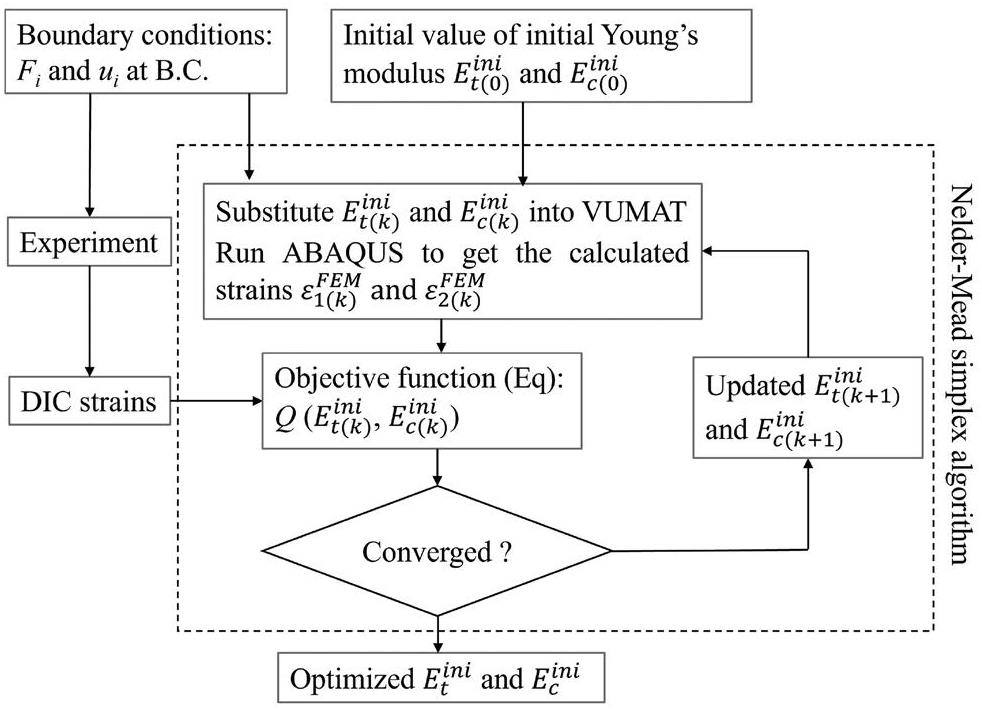
Step 3: Incremental determination of the damage parameters dt and dc under tension and compression through the FEMU inverse method.
This step is similar to Step 2. The initial segment inversed from the previous step was incorporated into VUMAT, and an FEM with the same boundary conditions as the experiment was established. Subsequently, the DIC strain, measured at a load time exceeding that of the former step, was selected as the target value to be incorporated into the objective function, as shown in Eq. 6. Secondly, the damage parameters
Damage-fracture model development
Theory
The nonlinear stress-strain response in fine-grained graphite was characterized by the damage law (Eq. 1) given in Sect. 3.1; however, it did not include the failure criterion. The critical stress or critical strain were often employed as failure criteria in graphite [26, 28], but they may be insufficient to characterize its fracture behavior, specifically stable crack propagation and toughening mechanisms [49, 50]. Some simulations indicated that using fracture energy as the damage criterion ensured good consistency with the experimental data [40, 51]. Therefore, the fracture energy Gf from fracture mechanics was chosen as the failure criterion to supplement the previous damage model.
To implement finite element analysis, based on previous studies on the nuclear graphite damage evolution and fracture process [4, 11], the degradation process of the graphite properties under stress was defined according to the following three states (as shown in Fig. 7(a)) in the FEM:
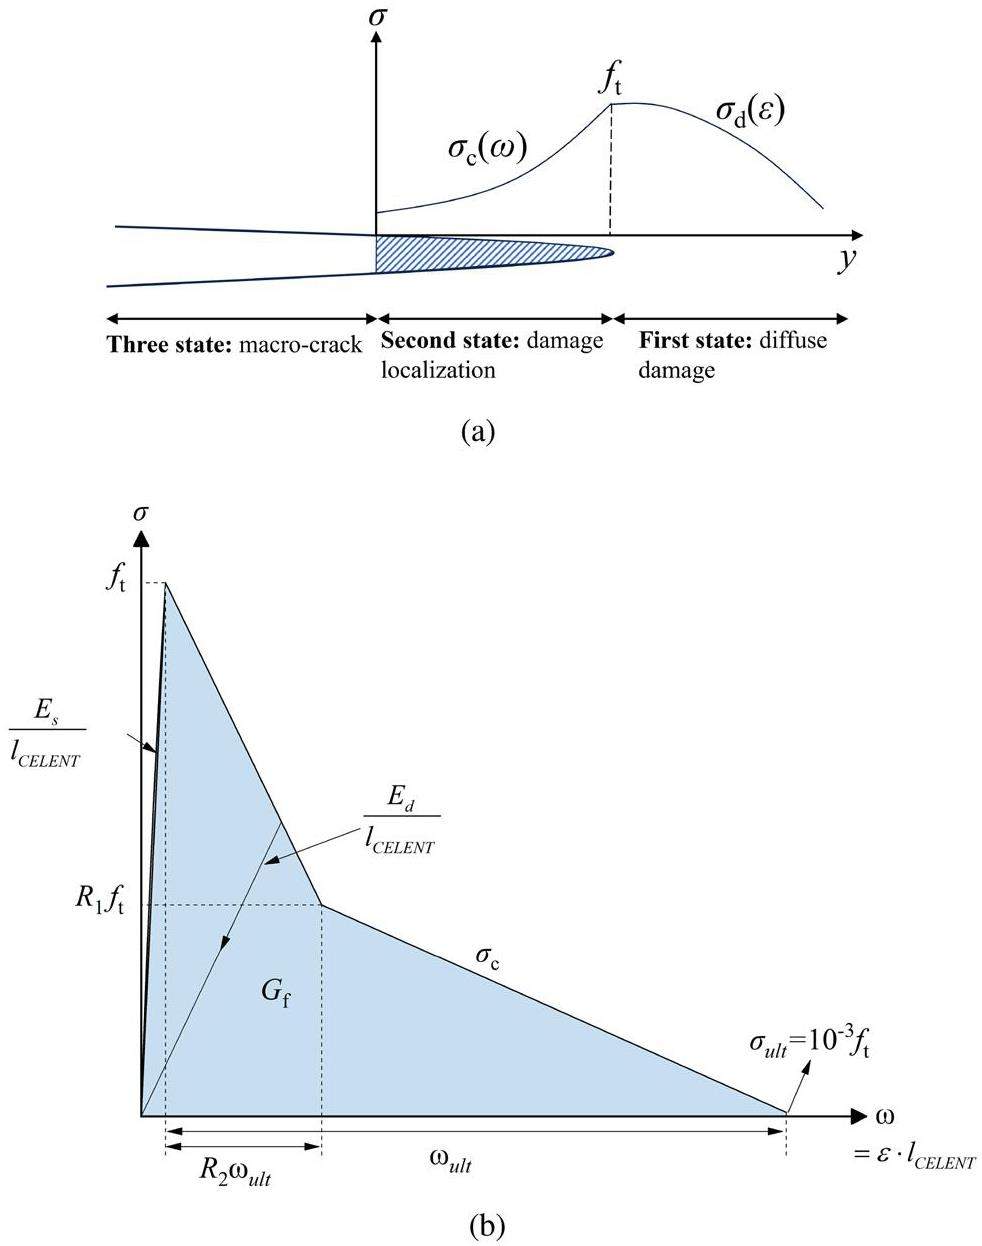
First state: The material is in the diffuse damage state when its maximum principal stress is less than its tensile strength (
Second state: The material is in the damage localization state when the stress level reaches its tensile strength (
Third state: As the microcrack localization area develops, the cohesive stress between microcracks gradually reduces to zero. At this point, the microcracks evolve into stress-free macro cracks and continue to propagate with the ongoing deformation. In the FEM, when the cumulative energy dissipation of an element reaches the fracture energy Gf, that element is deleted to simulate crack propagation. To reduce the influence of element size on the calculation of energy consumption, relative displacement is used to calculate the energy dissipation of an element instead of strain [41], as follows:
The above process only considers the Mode I (opening type) fracture condition. In applications where Mode II fractures predominate, the stress criterion ft and fracture criterion Gf proposed above should be adjusted to adapt to the characteristics of such fractures [12].
Determination of fracture properties
To acquire the fracture parameters necessary for the aforementioned model, i.e. the fracture energy Gf and the shape parameters R1 and R2 of the TSC (Fig. 7(b)), an FEM integrating the above theory was established by VUMAT. This FEM had the same boundary conditions as the three-point bending test in Sect. 2.2, and its simulated load-displacement response was compared with the experimental results to optimize the values of the fracture parameters.
As shown in Fig. 8, quadrilateral elements and a two-dimensional plane stress assumption were used in the FEM. In the predicted crack propagation area, square elements with a size of 0.2 mm were employed to refine the mesh and decrease the model’s sensitivity to the element shape and size [40, 52]. Prior to the stress reaching the tensile strength, the damage law of Young’s modulus adhered to the inverse results obtained by the method described in Sect. 3.1. Poisson’s ratio was set to 0.14, and the tensile strength was set to 27.6 MPa [53].

In FEM, applying IG11 graphite’s typical Young’s modulus value of 10 GPa could lead to inaccuracies in parameter optimization. This is because Young’s modulus can vary between individual graphite specimens owing to the significant spatial heterogeneity of the properties in bulk graphite [54, 55]. Therefore, to input a more accurate Young’s modulus into the model, the Young’s modulus of the specimen was calculated from the experimental P-CMOD curve using the formulas (Eq. 10) provided in Tada’s Stress Intensity Factor Handbook [56]. For the standard three-point bending notched beam with a span-to-depth ratio of 4, these formulas were as follows:
Results and discussion
Damage properties
Linear elastic model results
As expected [57], all the disc specimens failed owing to cracking at their center. The failure loads and tensile strengths of three disc specimens with different diameters are listed in Table 4. The findings indicate that the tensile strength was affected by size, with larger specimens exhibiting lower tensile strengths. This trend is consistent with previous research where the strength data were analyzed using the Weibull weakest link theory [58].
| Mean radius (mm) | Mean thickness (mm) | Failure load (N) | Tensile strength calculated by ASTM formula [47] (MPa) |
|---|---|---|---|
| 5.07 | 5.17 | 2573.73±159.28 | 29.15±1.73 |
| 7.55 | 7.62 | 5466.81±370.62 | 28.17±1.87 |
| 10.07 | 10.15 | 9303.85±589.25 | 27.00±1.76 |
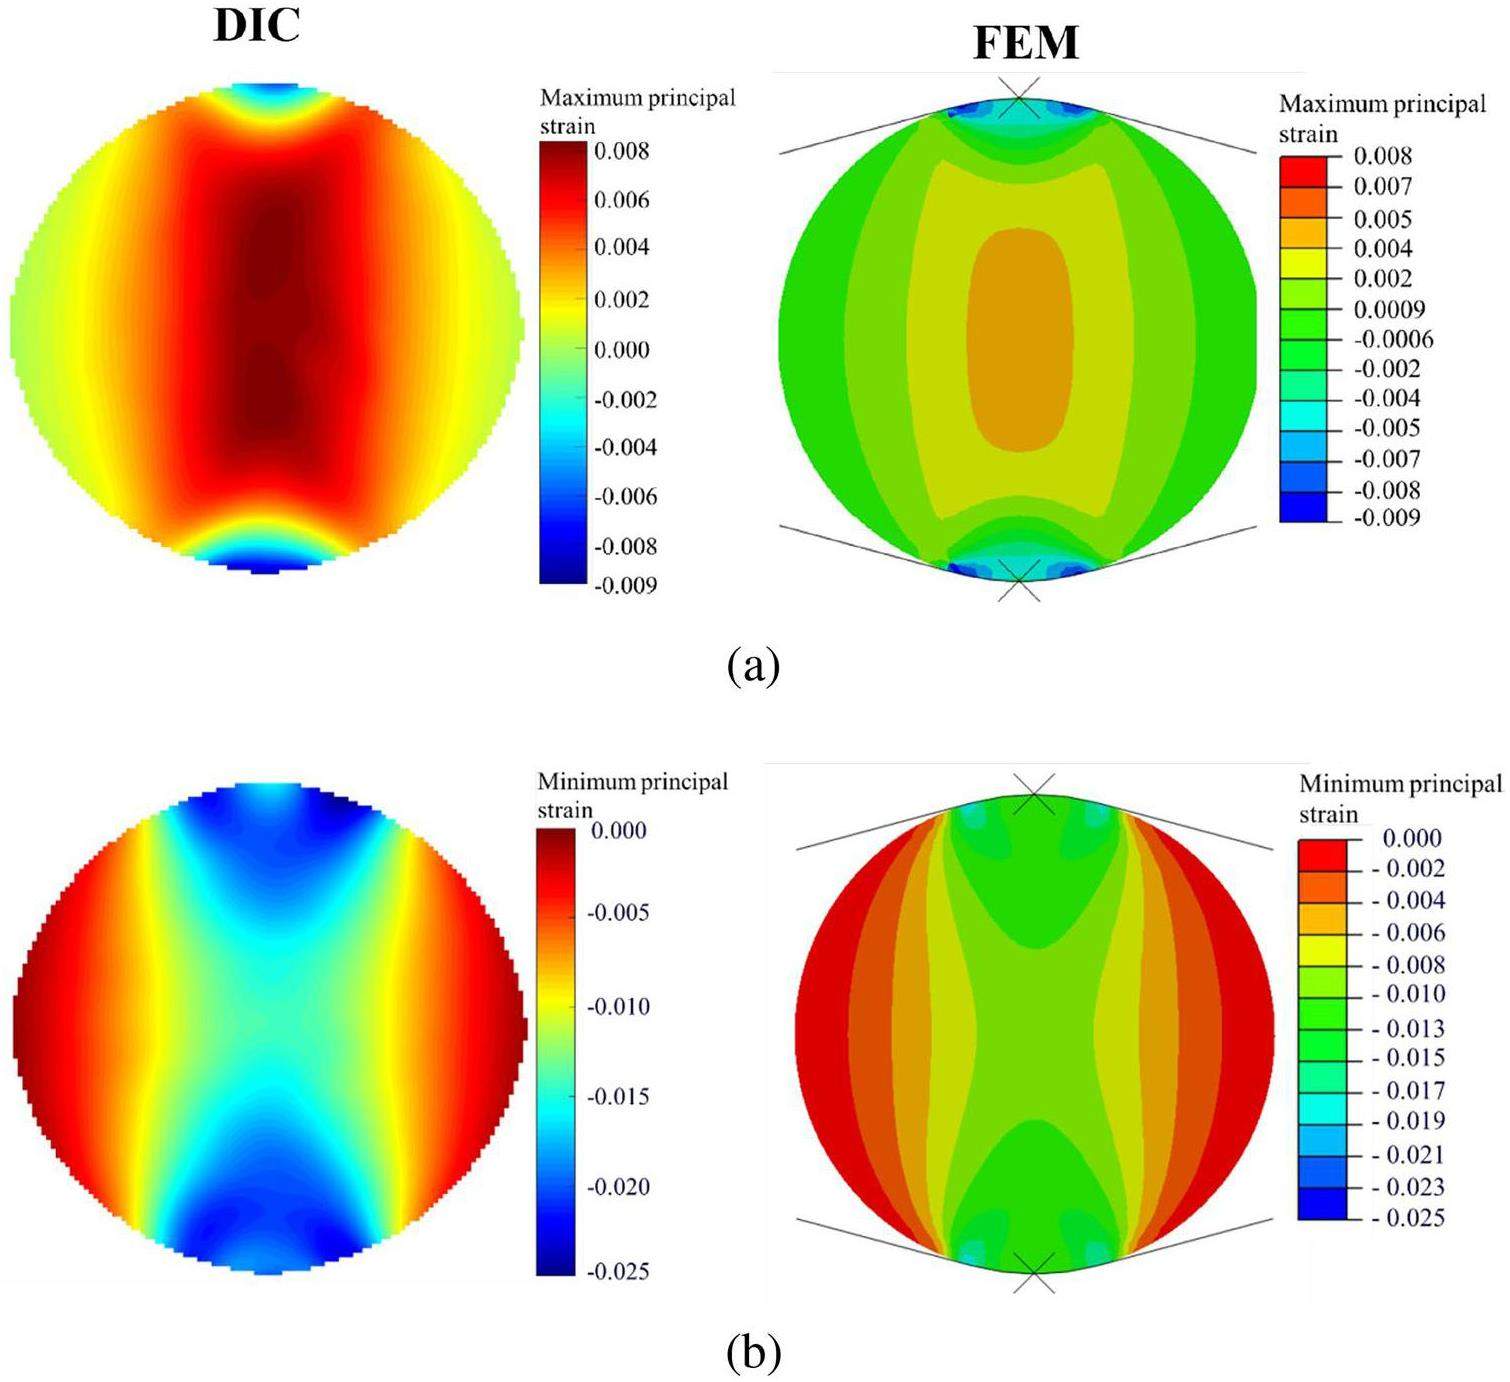
To assess the suitability of the linear elastic model for simulating graphite deformation, using a 15 mm-diameter specimen as a representative example, the principal strain fields at failure load were calculated using a linear elastic FEM with a Young’s modulus of 10.5 GPa and compared with the strain fields measured using DIC in experiments, as shown in Fig. 9. The comparison revealed qualitatively similar strain distributions; however, quantitative differences were observed. More specifically, strain levels measured using DIC were higher than those obtained using the FEM. For the maximum principal strain, the average DIC-measured value (0.0038 ± 0.0029) was approximately 39.47% greater than the average simulated value (0.0023 ± 0.0019). Similarly, for the minimum principal strain, the average DIC-measured absolute value (0.0115 ± 0.0061) was approximately 35.65% greater than the simulated value (0.0074 ±0.0035). The primary reason for this mismatch is the nonlinear stress-strain behavior intrinsic to graphite [11], although it is less apparent in fine-grained graphite than in coarser grains. Thus, simulating graphite using a linear elastic model may yield an underestimation of the real deformation.
Damage evolution law
By applying the procedure in Sect. 3.1 to the experimental data from one specimen per size, the damage evolution in the graphite specimens was characterized by quantifying the change in Young’s modulus with increasing strain, as shown in Fig. 10. The Young’s modulus was found to reduce with increasing strain level, and this damage behavior varied for compressive and tensile strains. Specifically, the Young’s modulus reduced more in tension at the same strain level. Additionally, the initial Young’s modulus obtained had an average value of 10.97 GPa, which was close to the 10.5 GPa provided by the supplier. As expected, the size of the specimens did not significantly affect the inversion results because damage law is an inherent property of graphite.
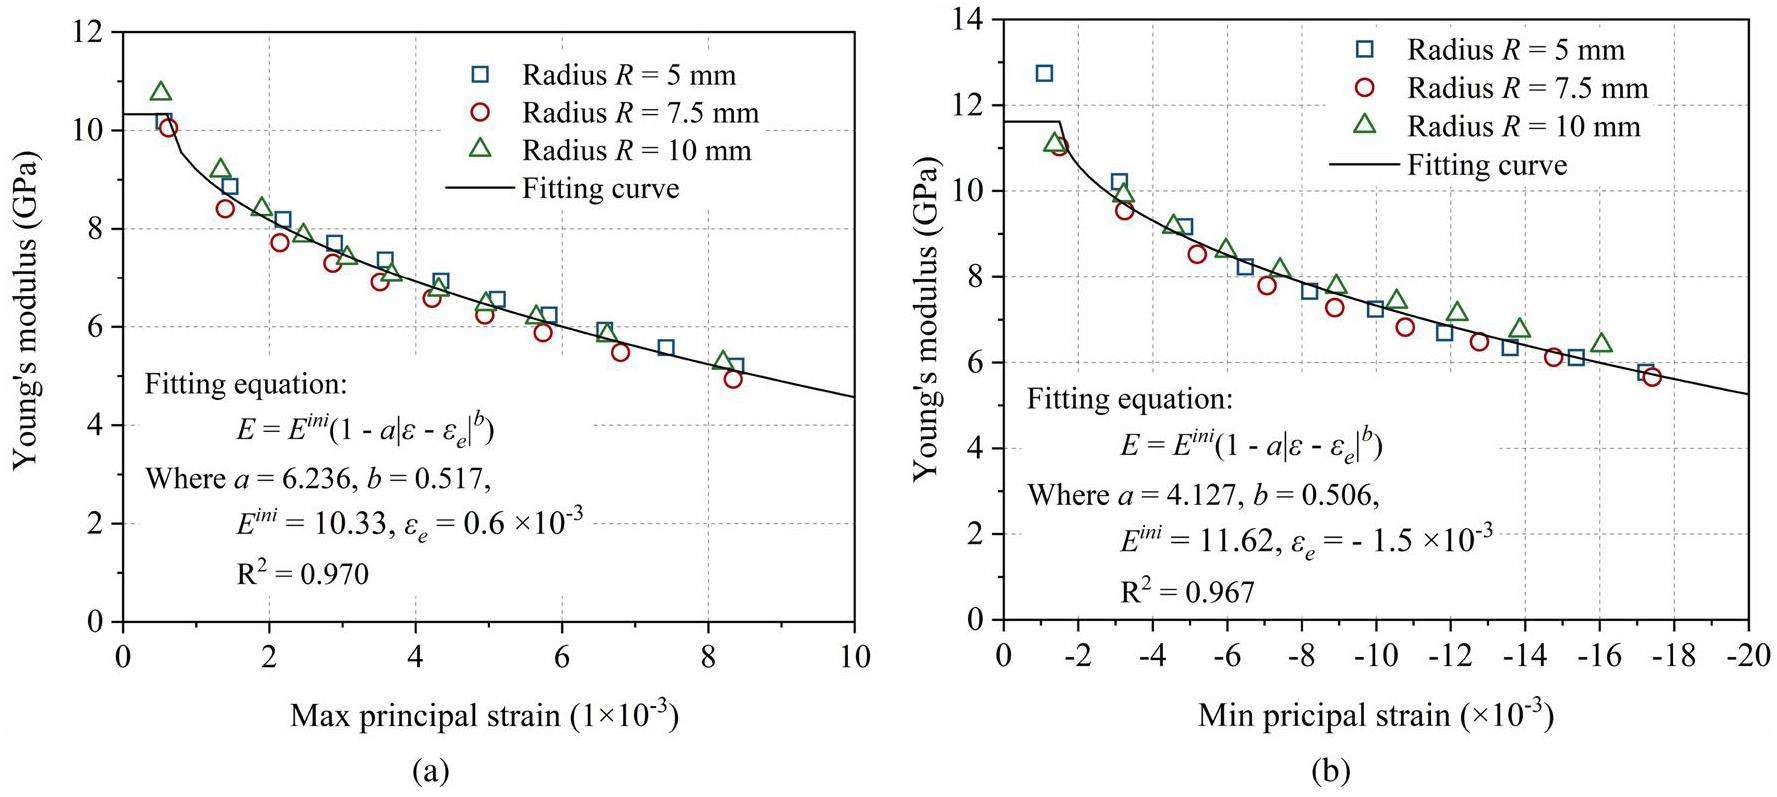
To simplify the use of the identified damage law in finite element analysis, the segmented results in Fig. 10 were fitted by the continuous equation in Eq. 12.
Comparison between damage FEMs and experiments
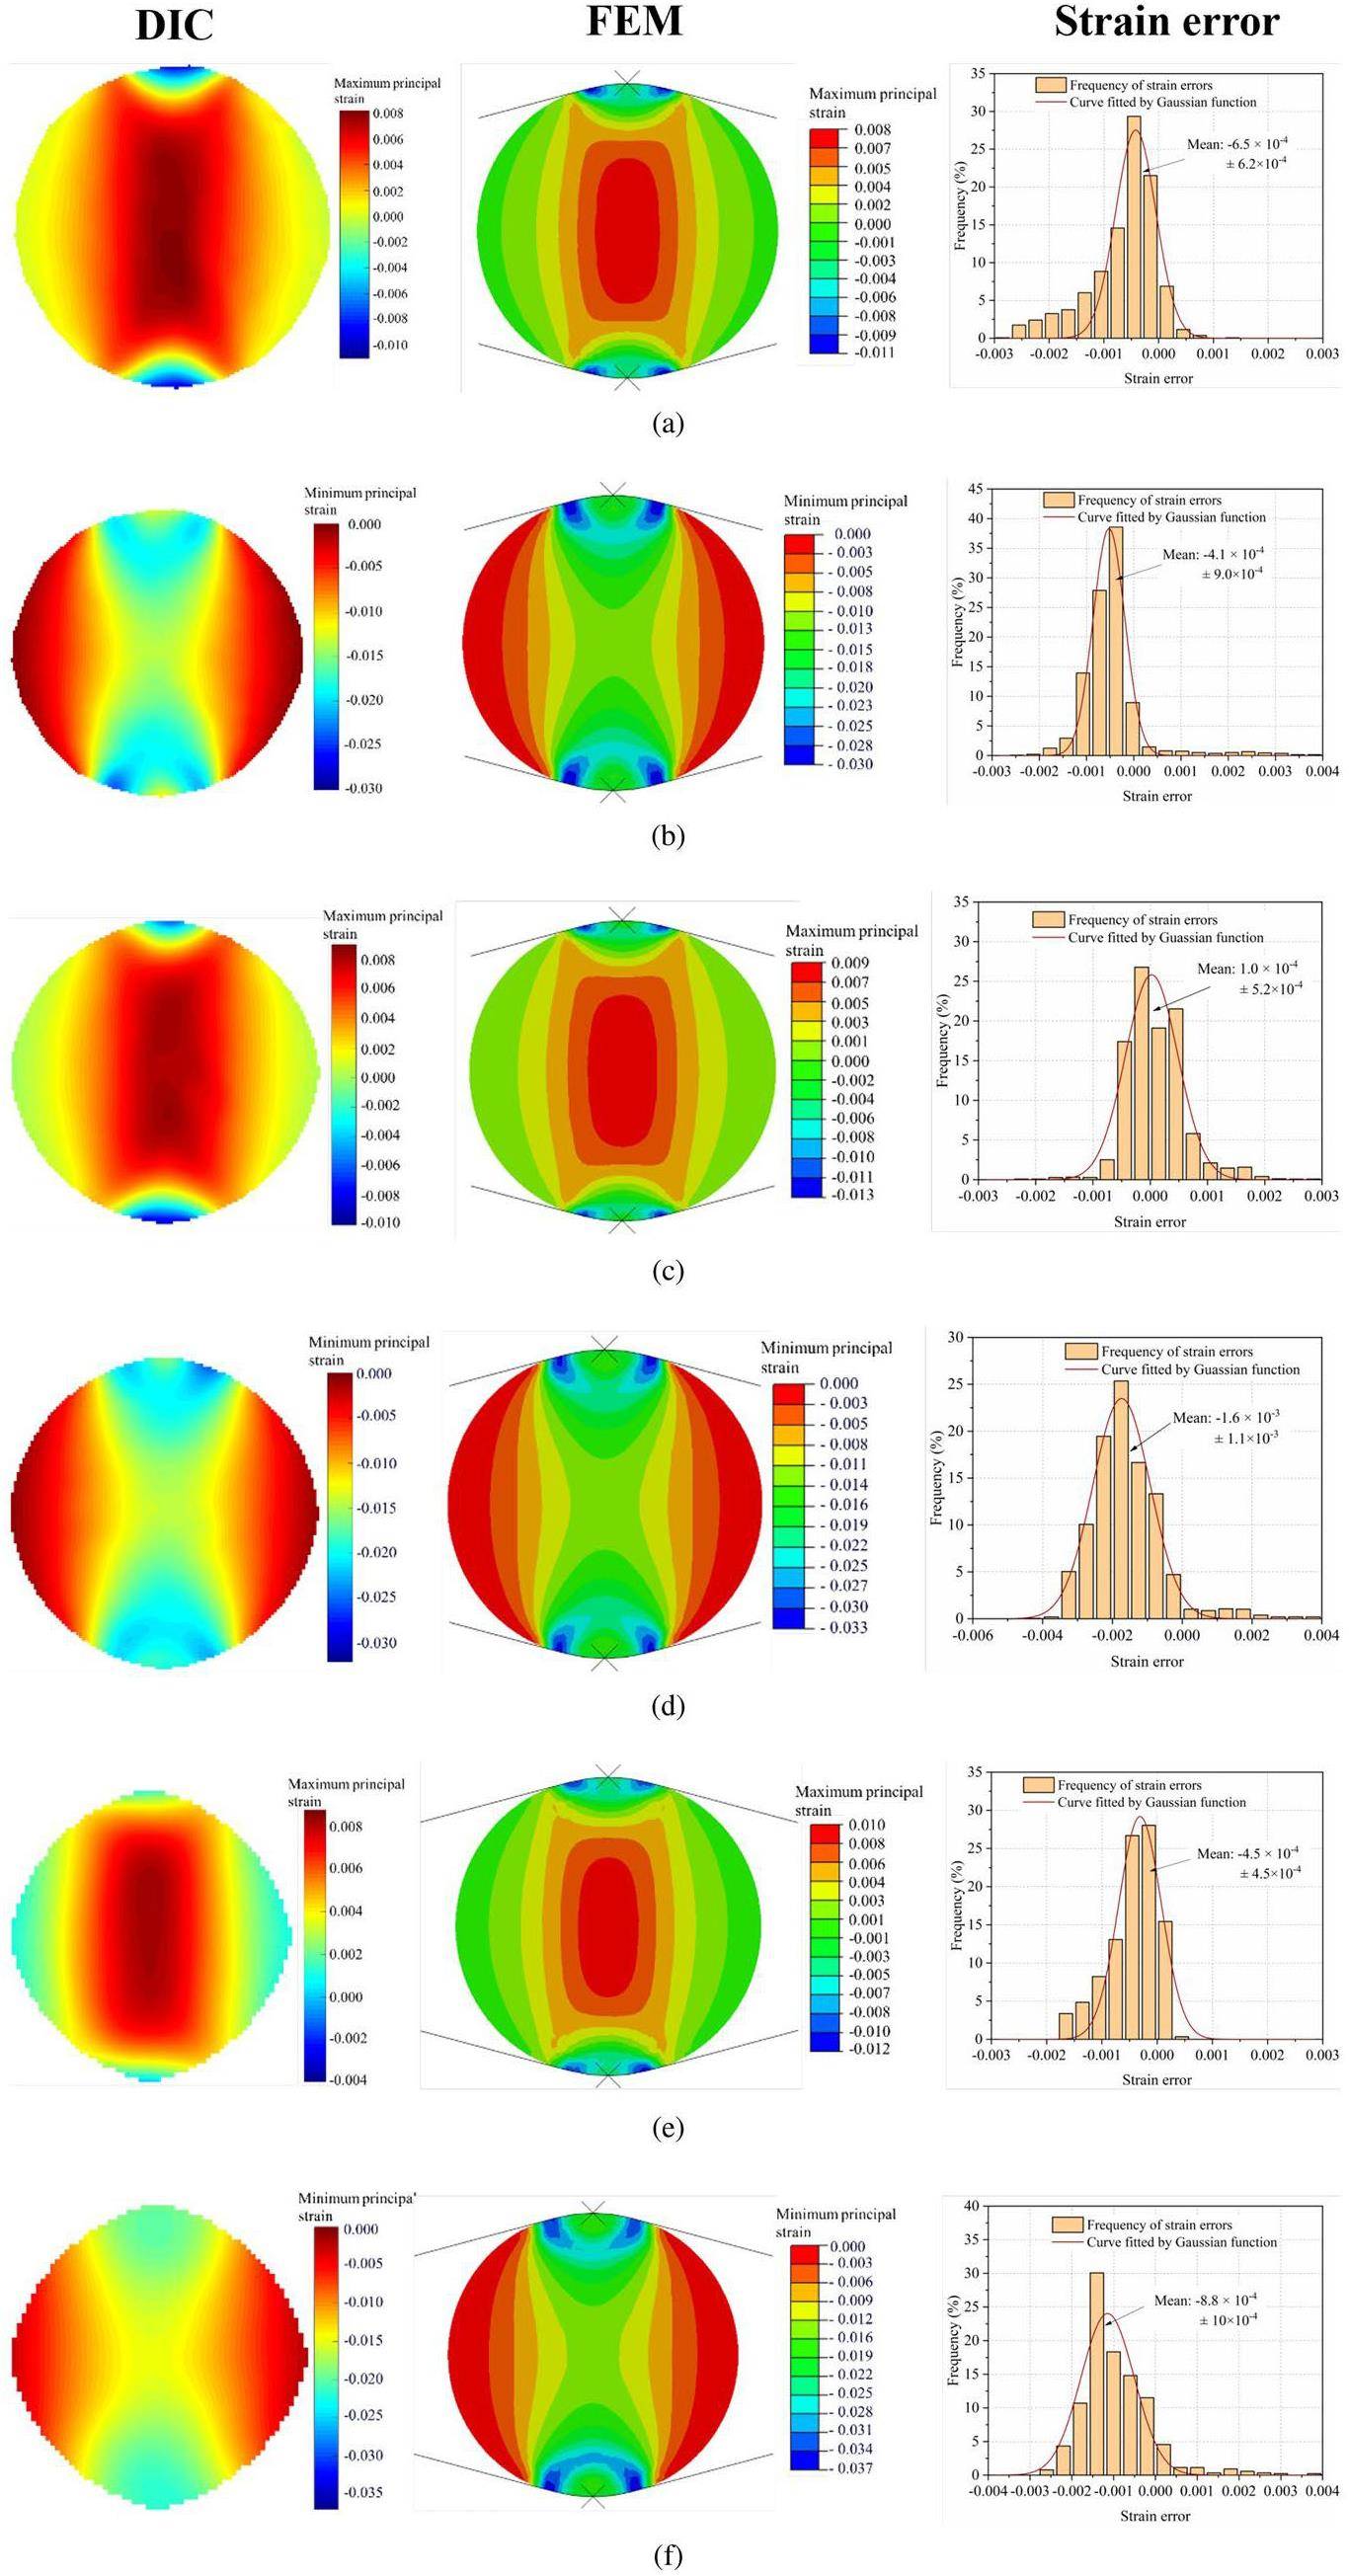
To verify the accuracy of the damage law obtained using the inversion analysis, the fitted damage law (Eq. 12) was used in the finite element analysis to simulate disc specimens of three sizes, and the FEM-calculated strains were compared with the DIC-measured strains at the failure load, as shown in Fig. 11. The strain distributions and values of FEMs and DIC were almost consistent, exhibiting no significant variations with the size of the specimen. This indicates that the FEMs with the damage law can effectively simulate non-linear deformation in graphite specimens. It should be noted that the edge information of the specimen was ignored in the DIC analysis, causing slight differences with the FEM simulation results in the edge region. To quantify the differences between the simulation and the experiment, the strain error values, calculated by subtracting the simulated values from the experimental values, were plotted in frequency distribution graphs (on the right of Fig. 11). They indicate that the strain errors fluctuate around zero and are well fitted by a Gaussian function. This fluctuation may be due to the microscopic heterogeneity of graphite, tolerance of the specimen and the fixture, and combined measured error. This phenomenon has also been observed in previous graphite research [17].
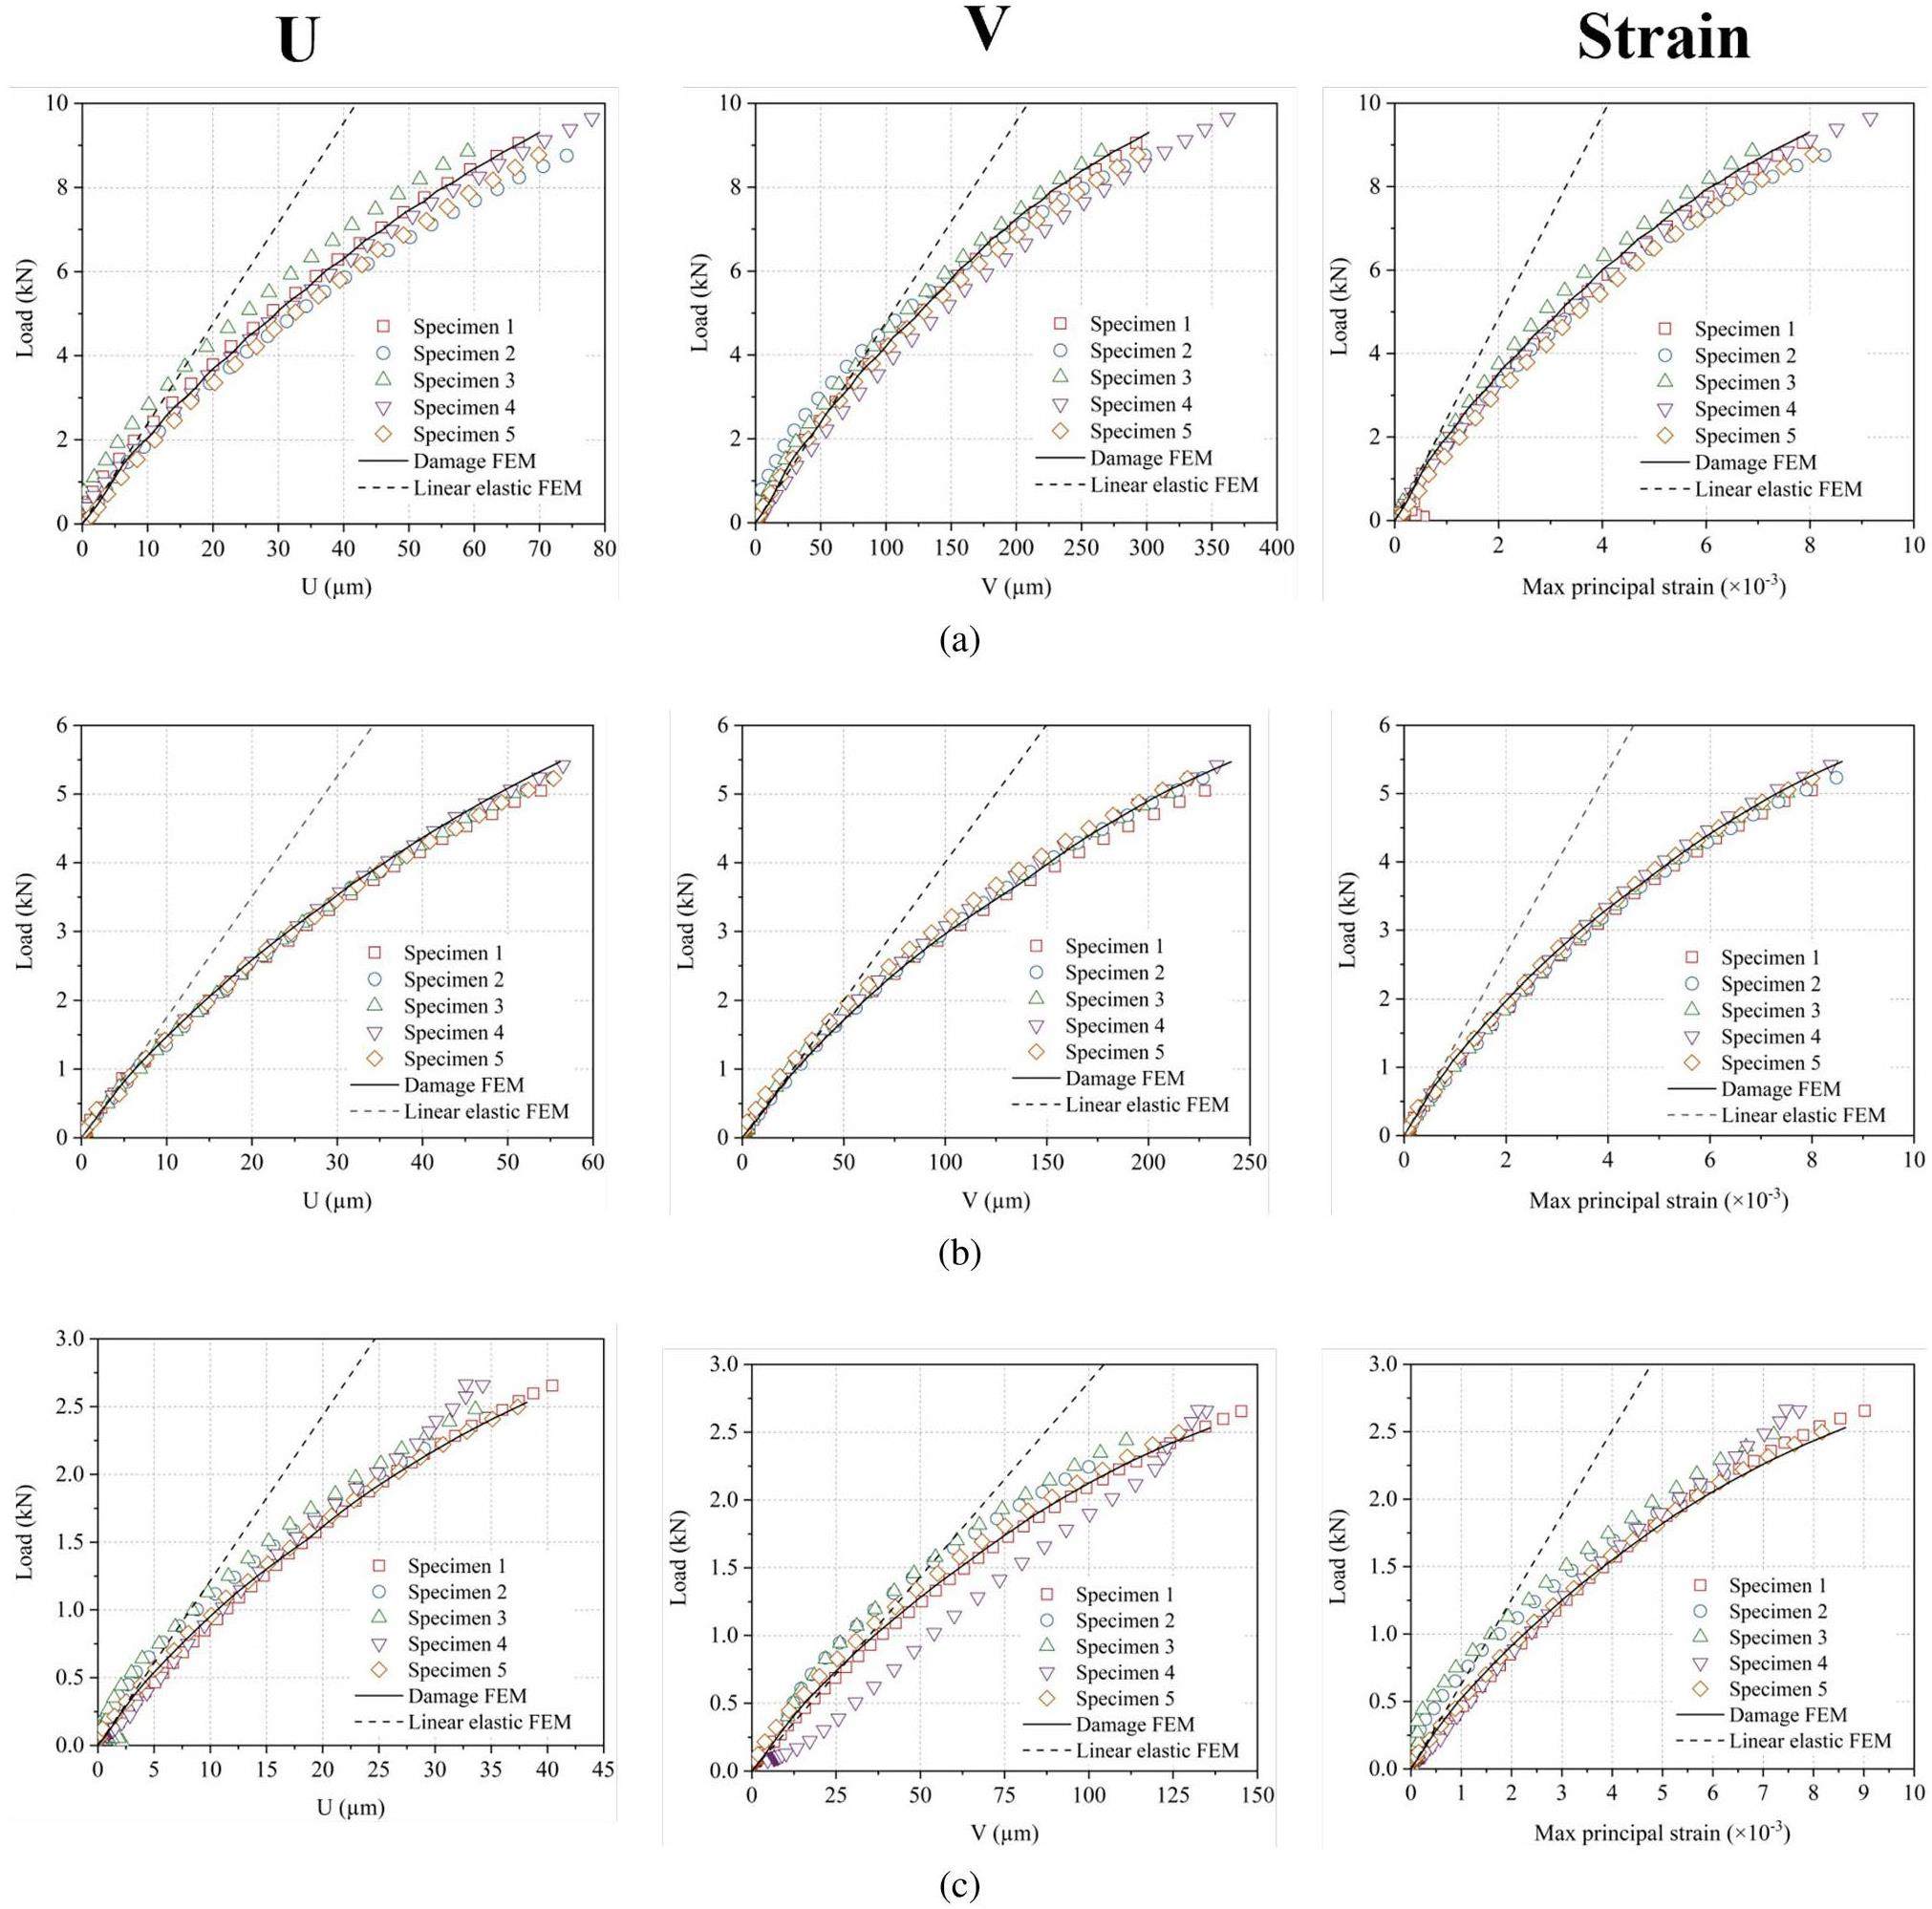
To visually depict the advantage of this damage model over the linear elastic model in simulating graphite, the linear elastic model and the DIC-measured results were compared in terms of the transverse deformation U, longitudinal deformation V, and the maximum principal strain at the center position in the specimens, as shown in Fig. 12. It was demonstrated that the damage model matched the experimental data quite well, whereas the linear elastic model significantly underestimated the actual deformation and strains of the specimens. The damage model can accurately simulate both tensile and compressive responses, which may be difficult for a single damage variable model.
Fracture properties
Young’s modulus
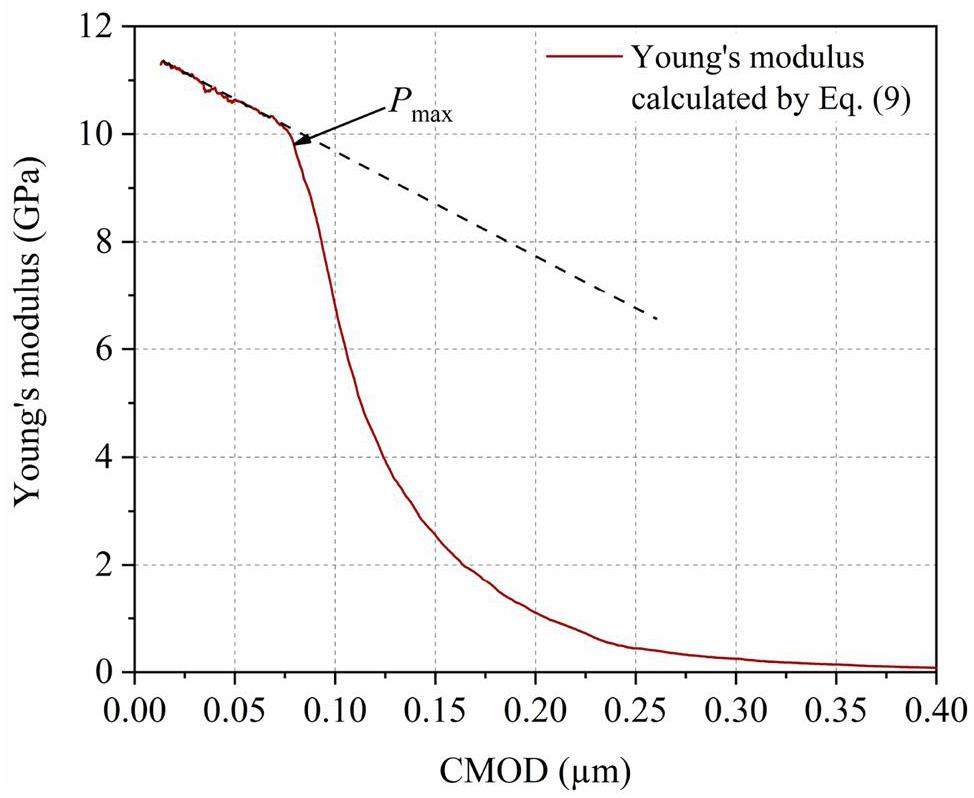
By inserting the CMOD values measured by the clip gauge and the corresponding applied load into the Eq. 10, the global Young’s modulus of the center-notched beam specimen was determined, as shown in Fig. 13. Because the notch length input into Eq. 10 was always the initial length, once the notch extended, the calculated Young’s modulus no longer reflected the actual material properties, but it could still be used to represent the specimen’s overall stiffness. According to Fig. 13, the initial Young’s modulus of the specimen was 11.29 GPa, and this value was incorporated into the subsequent inversion of fracture parameters. Additionally, when the load reached slightly less than the peak load (93% of the peak load), a sharp decrease in the global Young’s modulus of the specimen was observed. This decline may be attributable to the propagation of the main crack, which weakens the overall stiffness of the specimen. In another three-point bending test with the center-notched IG11 graphite beam [59], it was found that the critical load for the onset of crack extension was slightly smaller than the peak load. Thus, Eq. 10 may help identify the initiation point of the crack in the specimen.
Fracture parameters
The fracture parameters Gf, R1, and R2 in the FEM were optimized by comparing the simulated and actual load-displacement curves in the three-point bending test, including P-CTOD, P-CMOD, and P-δ (deflection) data, to obtain the values of the fracture parameters that offer the best match between the simulation results and the experimental outcomes. The optimization results indicated that when Gf was set to 176 N/m, R1 to 0.397, and R2 to 0.242 (Eq. 9), the simulated load-displacement curves exhibited a high degree of consistency with the experimental curves, as shown in Fig. 14. These optimized fracture parameters were close to those obtained in previous studies on fine-grained graphite [36]. Ultimately, all parameters required by the damage-fracture model for fine-grained graphite were determined and are displayed in Table 5.

| Damage fracture parameters | Values |
|---|---|
| Poisson’s ratio, μ | 0.14 |
| Initial Young’s modulus, Eini (GPa) | 11.29 |
| Tensile damage parameter 1, at | 6.236 |
| Tensile damage parameter 2, bt | 0.517 |
| Compressive damage parameter 1, ac | 4.127 |
| Compressive damage parameter 2, bc | 0.506 |
| Fracture energy, Gf (N/m) | 177 |
| Tensile strength, ft (MPa) | 27.6 |
| Tensile softening curve parameter, R1 | 0.397 |
| Tensile softening curve parameter, R2 | 0.242 |
The specific fracture energy
Simulation of fracture behavior
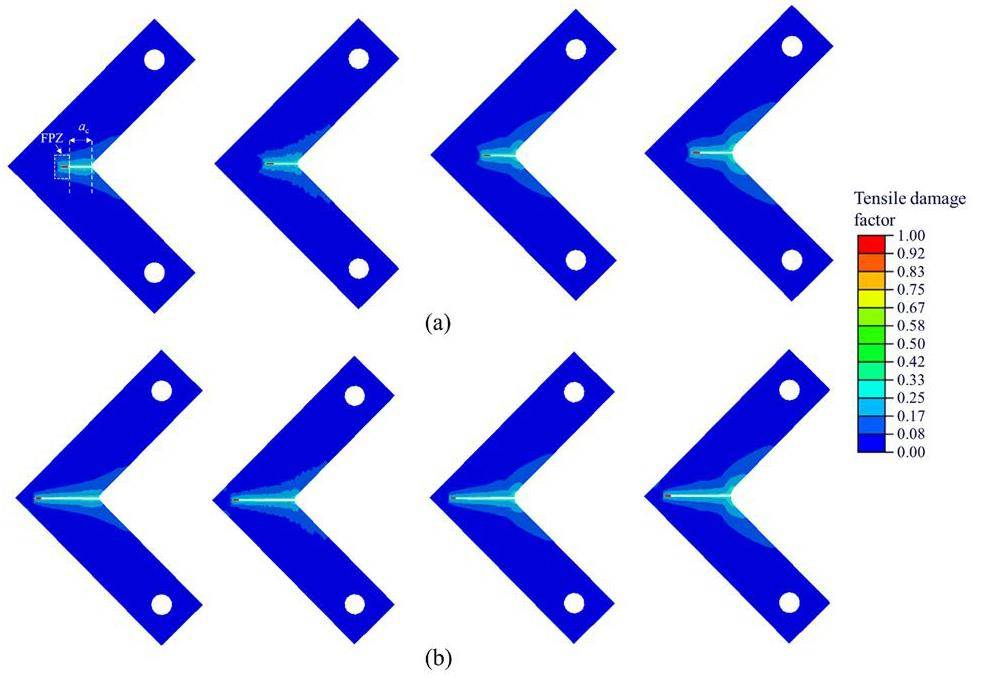
Figure 15 shows the distributions of the tensile damage factors in the FEM at different loading stages. This factor reflects the degree of damage caused by tensile strain, with values ranging from 0 (no damage) to 1 (complete damage). When the tensile damage factor reached 1, the corresponding elements were removed in the simulation, creating blank areas in Fig. 15. The damage distributions can be divided into three regions: front zone, wake zone, and macro-crack zone (Fig. 15(c)). These regions correspond to the three states described in Sect. 3.2.1. The size of the entire damage region was measured (Fig. 15), indicating that the size of the region initially increased from small to fully developed and then gradually decreased. This process was consistent with the changes in the fracture process zone (FPZ) observed in many graphite tests [35, 51, 60, 61]. That is, as the stress level in the specimen increases, the FPZ gradually enlarges until it is fully developed; when the crack propagates close to the specimen edge, the FPZ starts to shrink owing to the boundary effects.
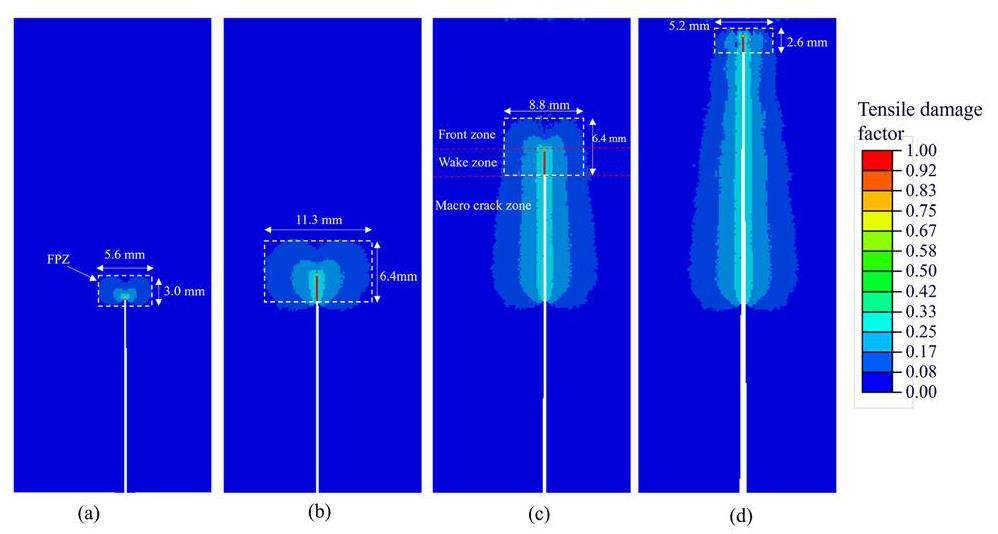
Further observations (Fig. 15) indicated that when the load exceeded 76% Pmax (Fig. 15(a)), the damage began to localize, and the wake zone formed. A previous study [62] on IG11 three-point bending beams found that the P-CTOD curve transitions from linear to non-linear at approximately 84% Pmax, which may be explained by the occurrence of damage localization in the model. In addition, when the FPZ was fully developed (Figs. 15(b) and 10(c)), the observed wake zone length was approximately 2.6 mm, which was close to the value of approximately 2.5 mm observed in previous graphite single edge notched beams [63]. However, it should be noted that the size of the FPZ often varies depending on the shape of the specimen, so it should not be considered an inherent property of graphite. In summary, the damage-fracture model effectively simulated some fracture characteristics observed in the experiment, including stable crack propagation, FPZ changes with crack propagation, and the front zone and wake zone in the process zone.
In previous fracture behavior simulations of graphite notched specimens [14, 40], although the damage evolution prior to reaching tensile strength was ignored, the simulation results still closely matched the experimental load-displacement response. This could be because the notch’s sharp shape concentrated severe stress in a limited area around the notch tip, limiting the influence of diffuse damage on the specimen’s overall response. If the notch tip were blunted, the influence of the front zone might be enhanced. Furthermore, this omission could overlook the damage in the front zone, which seems to diverge from the strain field concentration around the notch tip observed in experiments [60].
Application of the damage-fracture model
In engineering applications, to prevent component failure due to severe stress concentration, circular fillets are frequently made at the corners of steps, grooves, or notches on graphite components. L-shaped components are simplified representations of such geometries. When simulating these components using fracture models that only consider softening after reaching tensile strength, such as the concrete damage plasticity model (CDP), the cohesive zone model (CZM), or damage models based on traction-separation laws in ABAQUS [41], it may not be possible to precisely obtain stress-strain information and accurately assess the component’s failure strength [20]. Therefore, to assess the influence of diffuse damage on the mechanical response of graphite components, two different FEMs were applied to simulate L-shaped specimens with varying fillet radii. Both models had the same fracture criteria, but one considered the damage evolution before tensile strength and whereas the other did not.
Finite element model
To enable comparison between the simulation results and previous experimental data [20], FEMs were created for specimens with geometric dimensions identical to those of the L-shaped graphite specimens described in Ref. [20]; the specific dimensions are shown in Fig. 16(a). In the FEM, quadrilateral elements and a two-dimensional plane stress assumption were used, and the mesh at the corner was refined to 0.3 mm. By coupling the midpoint of the holes, the hole at the bottom was fixed for both lateral and vertical displacements, whereas the hole at the top was fixed for lateral displacement and subjected to a vertical displacement load. The mesh and boundary conditions are shown in Fig. 16(b).
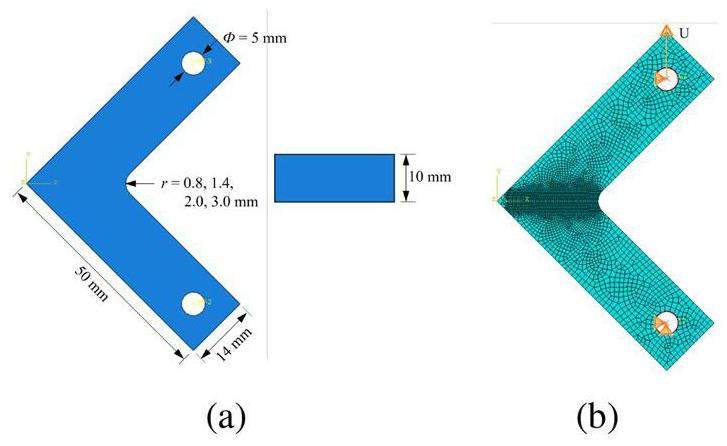
To investigate the diffuse damage influence on the model, each dimensional model was assigned two material property sets: one encompassing damage and fracture parameters as detailed in Table 5, and the other considering only fracture parameters with damage parameters set to zero. Both sets adopted a Young’s modulus and Poisson’s ratio of 10 GPa and 0.14, respectively, representing typical values for IG11 graphite.
Prediction of failure load
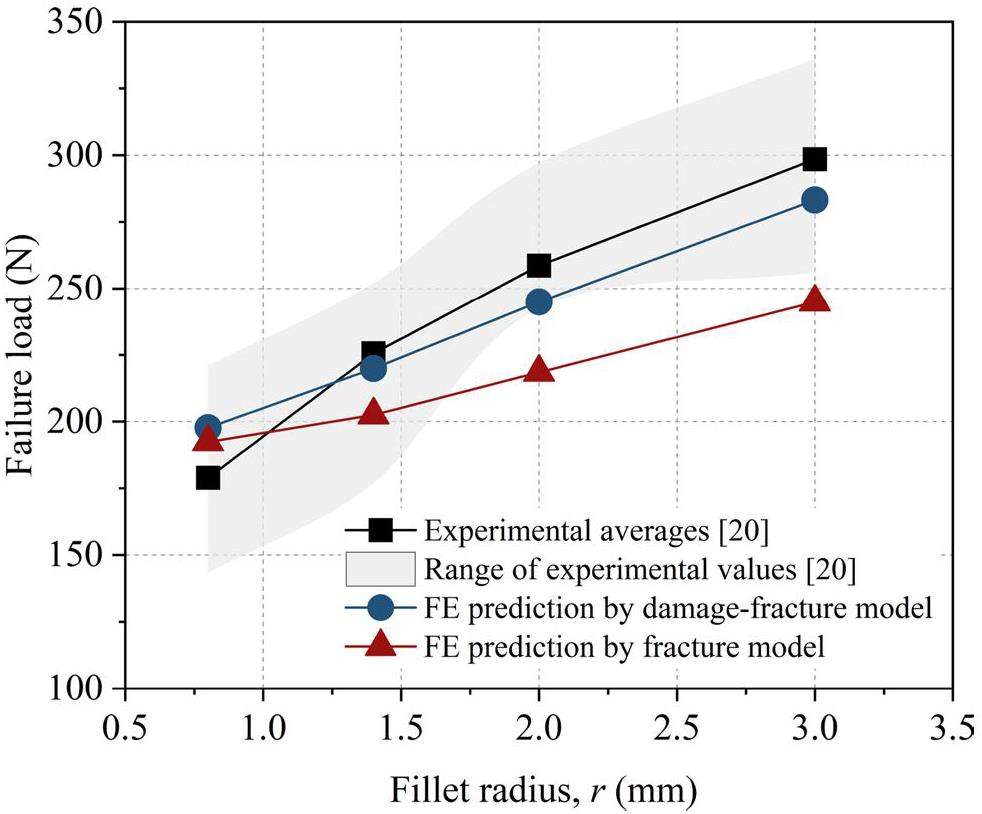
The failure loads (peak load) predicted by both groups of models are shown in Fig. 17, indicating an upward trend with an increase in fillet radius. This trend was attributed to the decrease in stress concentration as the fillet radius increased [20]. Moreover, the model accounting for damage and fracture exhibited a higher load-bearing capacity and was generally closer to the experimental values, whereas the model accounting for only fracture displayed an increasing discrepancy with the experimental values as the fillet radius increased. (Fig. 17). This is due to the diffuse damage in the fillet area that blunted the stress concentration, preventing the local strain energy from prematurely reaching the fracture energy and triggering the appearance of macro cracks in the models.
Simulation of damage behavior
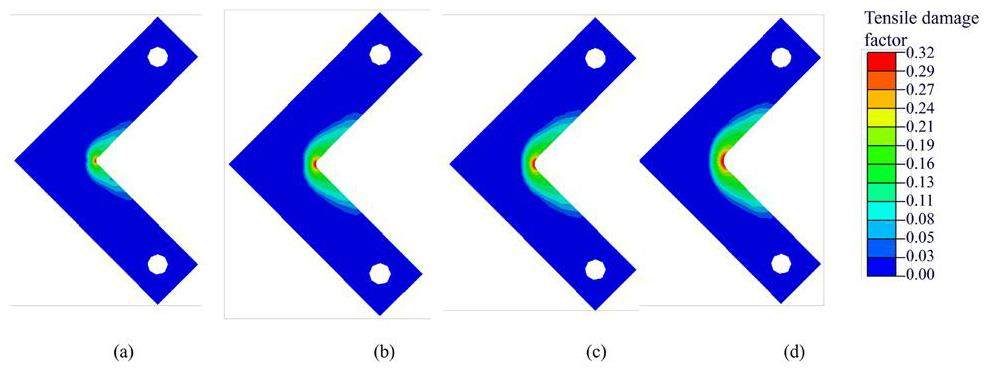
From the tensile damage distribution of the damage-fracture model at the failure load (Fig. 18), it can be observed that the area of damage distribution expanded as the fillet radius increased, enhancing the blunting effect. This may explain the trend observed in Fig. 17 where the difference in failure load between the damage-fracture model and the fracture model increased with the increase in fillet radius.
For local strains, taking the model with a fillet radius r = 1.4 mm as an example, the average tensile strain at the fillet (i.e., vertical strain) was extracted and compared with experimental data, as shown in Fig. 19. The results indicated that the predictions of the damage-fracture model aligned well with the measured experimental values, whereas the fracture model underestimated the actual strain within 50% to 99% of the failure load, and when the stress in the fracture model transitioned into the softening state, the strain values rapidly approached the experimental values. This indicates that the fracture model can simulate the specimen deformation well after softening occurs but exhibits errors between half the failure load and the onset of softening.
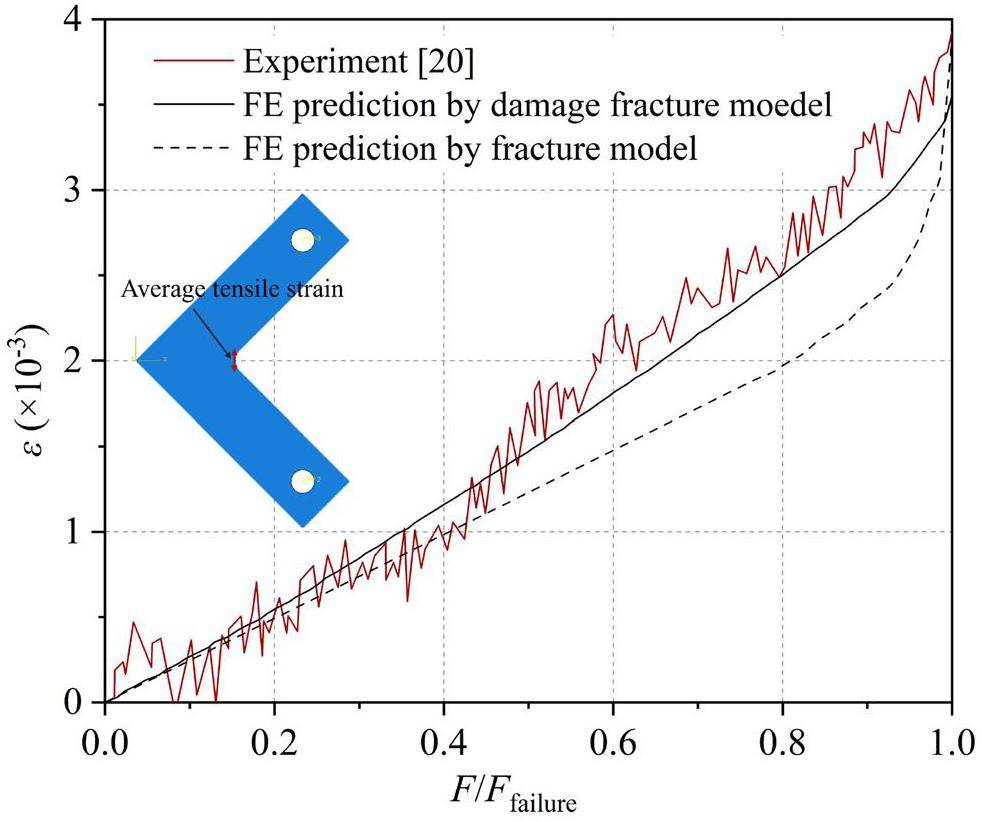
It should be noted that the damage evolution parameters used in the damage-fracture model were obtained from the inversion in CDI-1D graphite, but the simulation results were consistent with the experimental results of IG-11 graphite [20]. This may indicate that graphite samples with similar particle sizes and forming methods will follow similar damage laws.
Simulation of fracture behavior
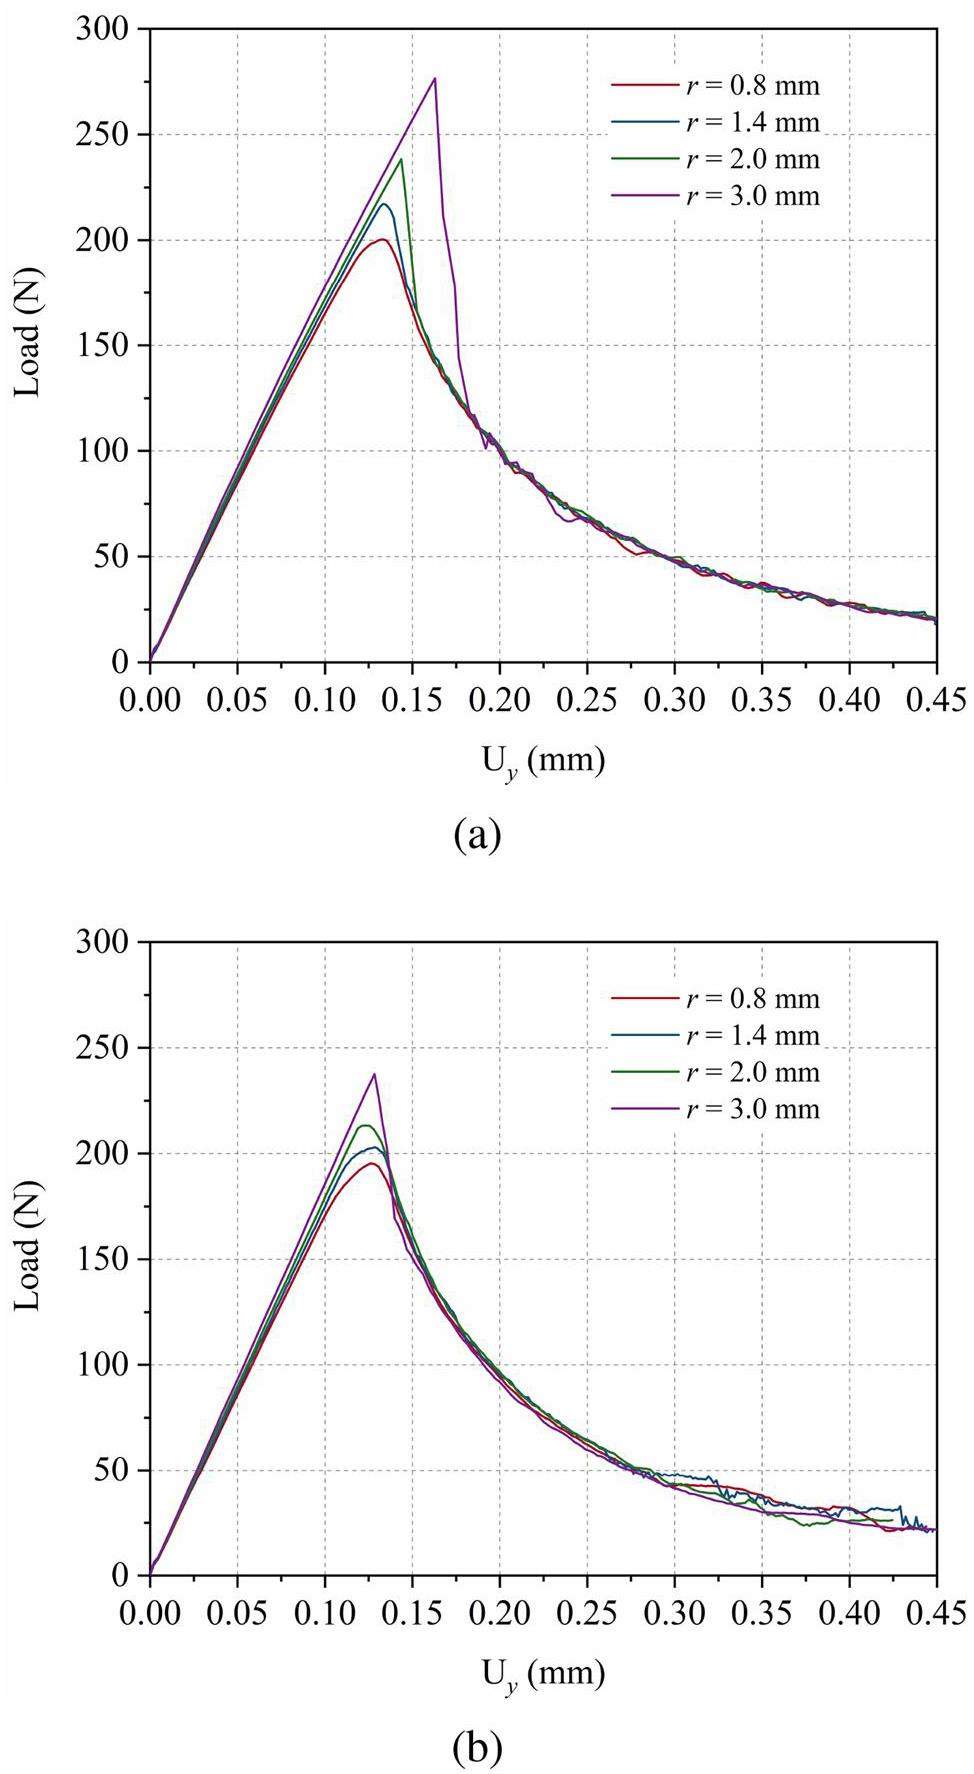
Both sets of models exhibited the failure mode of quasi-brittle materials [11], characterized by stable crack propagation and a descending load-displacement curve after the peak load, as shown in Figs. 20 and 21. From Fig. 20, the load-displacement curves of the models with a larger fillet radius were steeper and reached higher levels, indicating greater stiffness and load-bearing capacity. However, once the crack extended, the curves rapidly converged. To analyze this, Fig. 21 depicts the tensile damage distribution in the damage-fracture models during crack propagation. The varying fillet radius led to different damage distributions around the fillets; however, after the crack had extended by a certain length, the damage distributions around the stress concentration areas near the crack tips became nearly identical. To quantify the models’ damage, the macro crack length (ac) and the length and the width of the process zone (lFPZ and wFPZ, respectively) were measured, with the results shown in Table 6. The measurements indicated that the crack lengths and FPZ dimensions of models with different fillet radii were almost equivalent under identical loads. This may explain why the load-displacement curves ultimately converged. Furthermore, it was noted that the size of the FPZ near the specimen edges was reduced owing to boundary effects, consistent with patterns observed in previous simulations with graphite beams, but the dimensions of the FPZ varied because different boundary conditions.
| Fillet radius (mm) | ac (mm) | lFPZ (mm) | wFPZ (mm) | ac (mm) | lFPZ (mm) | wFPZ (mm) |
|---|---|---|---|---|---|---|
| P = 100 N (post peak) | P = 20 N (post peak) | |||||
| 0.8 | 5.6 | 3.1 | 5.8 | 13.9 | 1.8 | 2.6 |
| 1.4 | 5.9 | 3.3 | 5.6 | 13.8 | 2.0 | 3.4 |
| 2.0 | 6.1 | 3.2 | 5.8 | 14.3 | 1.7 | 2.8 |
| 3.0 | 7.7 | 3.5 | 5.8 | 14.6 | 2.0 | 2.9 |
| Mean | 6.3 | 3.3 | 5.8 | 14.2 | 1.9 | 2.9 |
| SD | 0.9 | 0.2 | 0.1 | 0.4 | 0.2 | 0.3 |
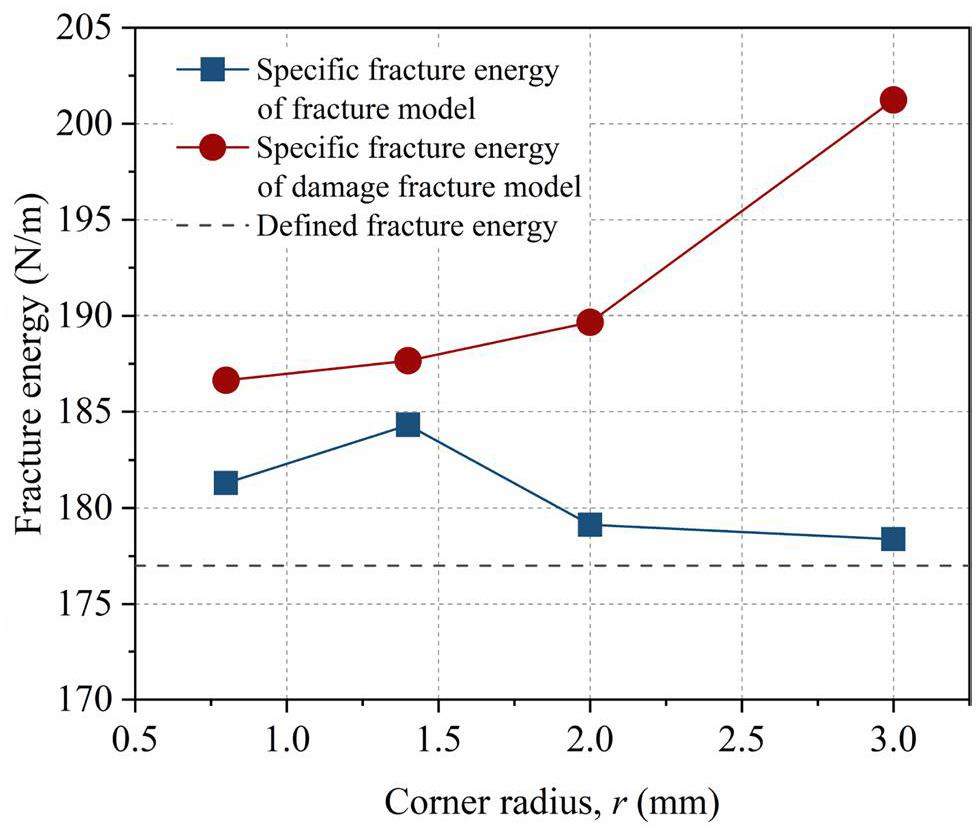
The specified fracture energy was calculated by dividing the area under the load-displacement curves in Fig. 20 by the fracture area (Eq. 13). It was compared with the defined fracture energy that was input into the FEM, as shown in Fig. 22. It was noted that the specified fracture energy of the fracture model fluctuated slightly above the defined fracture energy; however, the specified fracture energy of the damage-fracture model increased as the fillet radius increased. This increment could be attributed to the fact that, in the damage-fracture model, the dissipated energy was used not only for removing elements to form fracture surfaces but also in part for the evolution of diffuse damage. Furthermore, a larger fillet radius corresponds to a wider range of diffuse damage (Fig. 21); therefore, more energy was required to extend the same fracture surface in the damage-fracture models with larger fillet radii. As the defined fracture energy only accounts for the energy necessary to remove elements, it is less than the specified fracture energy determined from the damage-fracture model and close to that of the fracture model.
Conclusion
A segmented finite element inversion analysis method was developed to characterize the damage evolution in graphite disc compression specimens. The fracture properties of graphite were determined from a three-point bending test of a center-notched beam and the damage and fracture behavior of L-shaped specimens were simulated. The following conclusions can be drawn:
(1) The developed segmented inversion method allows the inverse identification of the reduction relationship between the Young’s modulus and the tensile and compressive strain from a single specimen without requiring a predefined continuous damage variable function.
(2) The established damage-fracture model can simultaneously simulate the nonlinear stress-strain response and stable crack propagation in graphite.
(3) Components with a larger fillet radius exhibit a broader damage area, which produces a more pronounced blunting effect. This helps alleviate stress concentration and improves the load-bearing capacity of the components.
Graphite—the most fascinating nuclear material
. Carbon 20, 3-11 (1982). https://doi.org/10.1016/0008-6223(82)90066-5The mechanical properties of reactor graphite
. Carbon 5, 519-531 (1967). https://doi.org/10.1016/0008-6223(67)90029-2A fracture criterion for nuclear graphite
. J. Nucl. Mater. 110, 186-195 (1982). https://doi.org/10.1016/0022-3115(82)90145-3Understanding fracture behaviour of PGA reactor core graphite: perspective
. Mater. Sci. Tech. Ser. 30, 129-145 (2014). https://doi.org/10.1179/1743284713Y.0000000354Evaluating alternate test techniques to characterize mechanical properties in nuclear-grade graphites
.Constitutive modeling and finite element procedure development for stress analysis of prismatic high temperature gas cooled reactor graphite core components
. Nucl. Eng. Des. 260, 145-154 (2013). https://doi.org/10.1016/j.nucengdes.2013.03.003Investigation on structural integrity of graphite component during high temperature 950 ℃ continuous operation of HTTR
. J. Nucl. Sci. Technol. 51, 1364-1372 (2014). https://doi.org/10.1080/00223131.2014.942240The development of a stress analysis code for nuclear graphite components in gas-cooled reactors
. J. Nucl. Mater. 350, 208-220 (2006). https://doi.org/10.1016/j.jnucmat.2006.01.015Rules for design of nuclear graphite core components–Some considerations and approaches
. Nucl. Eng. Des. 46, 313-333 (1978). https://doi.org/10.1016/0029-5493(78)90018-3Fracture behaviour of radiolytically oxidised reactor core graphites: a view
. Mater. Sci. Tech. Ser. 26, 899-907 (2010). https://doi.org/10.1179/026708309X12526555493477Failure predictions for nuclear graphite using a continuum damage mechanics model
. J. Nucl. Mater. 324, 116-124 (2004). https://doi.org/10.1016/j.jnucmat.2003.09.005Inverse identification of tensile and compressive damage properties of graphite material based on a single four-point bending test
. J. Nucl. Mater. 509, 445-453 (2018). https://doi.org/10.1016/j.jnucmat.2018.07.022Modelling Damage in Nuclear Graphite
.Inverse identification of graphite damage properties under complex stress states
. Mater. Design. 183,Characterization of heterogeneity and nonlinearity in material properties of nuclear graphite using an inverse method
. J. Nucl. Mater. 381, 158-164 (2008). https://doi.org/10.1016/j.jnucmat.2008.07.042Microstructural scale strain localisation in nuclear graphite
. J. Nucl. Mater. 381, 171-176 (2008). https://doi.org/10.1016/j.jnucmat.2008.07.013In situ measurement of the strains within a mechanically loaded polygranular graphite
. Carbon 96, 285-302 (2016). https://doi.org/10.1016/j.carbon.2015.09.058Change in dynamic young’s modulus of nuclear-grade isotropic graphite during tensile and compressive stressing
. J. Nucl. Mater. 119, 278-283 (1983). https://doi.org/10.1016/0022-3115(83)90204-0Experimental and simulation study on stress concentration of graphite components in tension
. Mech. Mater. 130, 88-94 (2019). https://doi.org/10.1016/j.mechmat.2019.01.010Synchrotron X-ray characterization of crack strain fields in polygranular graphite
. Carbon 124, 357-371 (2017). https://doi.org/10.1016/j.carbon.2017.08.075Assessment of the fracture toughness of neutron-irradiated nuclear graphite by 3D analysis of the crack displacement field
. Carbon 171, 882-893 (2021). https://doi.org/10.1016/j.carbon.2020.09.072Effects of tensile and compressive stresses on damage evolution law of nuclear graphite
. J. Nucl. Mater. 583,Stress-based criteria for brittle fracture in key-hole notches under mixed mode loading
. Eur. J. Mech. A-Solid. 49, 1-12 (2015). https://doi.org/10.1016/j.euromechsol.2014.06.009On fracture of kinked interface cracks –The role of T-stress
. Mater. Design. 61, 117-123 (2014). https://doi.org/10.1016/j.matdes.2014.04.074Mixed mode fracture analysis of polycrystalline graphite–a modified MTS criterion
. Carbon 46, 1302-1308 (2008). https://doi.org/10.1016/j.carbon.2008.05.008Mixed mode fracture analysis using extended maximum tangential strain criterion
. Mater. Design. 86, 941-947 (2015). https://doi.org/10.1016/j.matdes.2015.07.135Strain-based criteria for mixed-mode fracture of polycrystalline graphite
. Eng. Fract. Mech. 156, 114-123 (2016). https://doi.org/10.1016/j.engfracmech.2016.02.011Brittle fracture of sharp and blunt V-notches in isostatic graphite under pure compression loading
. Carbon 63, 101-116 (2013). https://doi.org/10.1016/j.carbon.2013.06.045Local strain energy density to predict mode II brittle fracture in Brazilian disk specimens weakened by V-notches with end holes
. Mater. Design. 69, 22-29 (2015). https://doi.org/10.1016/j.matdes.2014.12.037Fracture criteria of reactor graphite under multiaxial stesses
. Nucl. Eng. Des. 103, 291-300 (1987). https://doi.org/10.1016/0029-5493(87)90312-8The fracture of polygranular graphites
. Carbon 24, 581-602 (1986). https://doi.org/10.1016/0008-6223(86)90149-1Crack growth resistance in nuclear graphites
. J. Phys. D. Appl. Phys. 35, 927 (2002). https://doi.org/10.1088/0022-3727/35/9/315A study of dynamic crack growth in elastic materials using a cohesive zone model
. Int. J. Eng. Sci. 35, 1085-1114 (1997). https://doi.org/10.1016/S0020-7225(97)00030-XCharacterization on tensile behaviors of fracture process zone of nuclear graphite using a hybrid numerical and experimental approach
. Carbon 155, 531-544 (2019). https://doi.org/10.1016/j.carbon.2019.08.081Determination of the tension softening curve of nuclear graphites using the incremental displacement collocation method
. Carbon 57, 65-78 (2013). https://doi.org/10.1016/j.carbon.2013.01.033Influence of short cut fiber mixing and curing time on the fracture parameter of concrete
. Journal of Structural and Construction Engineering. 65, 1-6 (2000). https://doi.org/10.3130/aijs.65.1_3 (in Japanese)Local approach to fatigue of concrete
. Ph.D thesis,Simulation of crack propagation behavior of nuclear graphite by using XFEM, VCCT and CZM methods
. Nuclear Materials and Energy. 29,ABAQUS documentation
. Dassault Systèmes: Providence, RI, USA, 2020.Experimental and computational correlation of fracture parameters K, J, and G for unimodular and bimodular graphite components
. J. Nucl. Mater. 503, 205-225 (2018). https://doi.org/10.1016/j.jnucmat.2018.03.012Understanding the microstructure and fatigue behavior of magnesium alloys
. Ph.D thesis,Overview of Identification Methods of Mechanical Parameters Based on Full-field Measurements
. Exp. Mech. 48, 381-402 (2008). https://doi.org/10.1007/s11340-008-9148-yFracture toughness evaluation of a nuclear graphite with non-linear elastic properties by 3D imaging and inverse finite element analysis
. Eng. Fract. Mech. 293,Combined evaluation of Young modulus and fracture toughness in small specimens of fine grained nuclear graphite using 3D image analysis
. J. Nucl. Mater. 563,Static friction coefficient of graphite_metal friction couples
. Lubrication Engineering. 03, 11-13 (1999). (in Chinese)X-ray tomography observation of crack propagation in nuclear graphite
. Mater. Sci. Tech. Ser. 22, 1045-1051 (2006). https://doi.org/10.1179/174328406x114126R-curve behavior of a polycrystalline graphite - Microcracking and grain bridging in the wake region
. J. Am. Ceram. Soc. 71, 609-616 (1988). https://doi.org/10.1111/j.1151-2916.1988.tb06377.xFracture behavior of nuclear graphite under three-point bending tests
. Eng. Fract. Mech. 186, 143-157 (2017). https://doi.org/10.1016/j.engfracmech.2017.09.030A comparison of two damage models for inverse identification of mode i fracture parameters: Case study of a refractory ceramic
. Int. J. Mech. Sci. 197, (2021). https://doi.org/10.1016/j.ijmecsci.2021.106345Measurement of tensile strength of nuclear graphite based on ring compression test
. J. Nucl. Mater. 511, 134-140 (2018). https://doi.org/10.1016/j.jnucmat.2018.09.010Spatial variability in the mechanical properties of Gilsocarbon
. Carbon 110, 497-517 (2016). https://doi.org/10.1016/j.carbon.2016.09.051Assessment of heterogeneity and anisotropy of IG-110 graphite for nuclear components
. J. Nucl. Sci. Technol. 28, 713-720 (1991). https://doi.org/10.1080/18811248.1991.9731419Determination of tensile strength by modified brazilian disc method for nuclear graphite
. Exp. Techniques. 44, 475-484 (2020). https://doi.org/10.1007/s40799-020-00363-yCharacterization of tensile strength and fracture toughness of nuclear graphite NBG-18 using subsize specimens
. J. Nucl. Mater. 412, 315-320 (2011). https://doi.org/10.1016/j.jnucmat.2011.03.019Nonlinear fracture of a polycrystalline graphite–Size-effect law and Irwin’s similarity
. Fracture Mechanics of Ceramics. 337-351 (2005). https://doi.org/10.1007/978-0-387-28920-5_27Damage, crack growth and fracture characteristics of nuclear grade graphite using the Double Torsion technique
. J. Nucl. Mater. 414, 32-43 (2011). https://doi.org/10.1016/j.jnucmat.2011.04.058Energy dissipation during fracturing process of nuclear graphite based on cohesive crack model
. Eng. Fract. Mech. 242, (2021). https://doi.org/10.1016/j.engfracmech.2020.107426Study on fracture properties of nuclear graphite
. Nuclear Power engineering. 39, 79-83 (2018). https://doi.org/10.13832/j.jnpe.2018.01.0079 (in Chinese)Crack growth resistance in nuclear graphite
. Ph.D thesis,The authors declare that they have no competing interests.

